• UnderConstruction
  • Home
  • Seasons
  • Classes
  • Tours
  • About
  • CONTACT
  • Menus
Menu

Cucina Casa M

Street Address
City, State, Zip
Phone Number

Your Custom Text Here

Cucina Casa M

  • UnderConstruction
  • Home
  • Seasons
  • Classes
  • Tours
  • About
  • CONTACT
  • Menus

Orzo, Pancetta, Feta & Greens w/ Basil Lemon Vinaigrette

June 25, 2018 Nancy Madok
orzo cover.jpg

Ingredients

Basil Lemon Vinaigrette:
1T Dijon mustard
1 T lemon zest
¼ cup lemon juice
½ cup extra virgin olive oil
1 T Basil chiffonade
Salt and pepper

Salad:
4T olive oil
4 oz. diced pancetta
1 medium yellow or red onion finely diced
2 cloves garlic, crushed
1 box (1 pound) Orzo
4 cups baby spinach leaves, torn into pieces
1cup toasted walnuts, broken into pieces
8 oz. Feta cheese, crumbled

1.    Vinaigrette: In a small bowl, whisk together the mustard and lemon zest and juice. Slowly add the olive oil in a steady stream, whisking constantly until emulsified. Season with salt and pepper. Stir in basil. Set aside.


2.    In a medium sauté pan over medium heat, heat 2 tablespoons of olive oil. Add the pancetta and cook until brown and crispy. Using a slotted spoon, remove the cooked pancetta from the pan and place on a paper towel lined plate. Allow the pancetta to drain and then place in a large bowl. Set aside. 


3.    Remove any remaining fat from the pan. Place the pan back on the heat and add 2 tablespoons of the pancetta fat or more olive oil if necessary.


4.    Sauté the onions until soft, about 4-6 minutes. Add the garlic and cook an additional 1-2 minutes. Add to bowl with the pancetta and set aside.

5.    Bring a large pot of water to a boil. Add 1 tablespoon salt. Add the orzo and cook as per package directions.


6.    Drain the orzo and place in the bowl with the pancetta and onion mixture. Add the spinach. Toss with the hot pasta. 


7.    Add the vinaigrette and continue tossing until the spinach has wilted. Add the feta cheese and nuts, and toss till combined. Season with salt and pepper. 


8.    Place salad on platter and serve warm or at room temperature.

TIPS & TRICKS

•    Vinaigrette can be made ahead. Just add the basil at the last moment.
•    You can substitute bacon for pancetta.
•    Almonds or pecans can be substituted for walnuts.
•    Goat cheese and blue cheese are fantastic and can really change up the taste of this salad.
•    This salad is wonderful the next day.

In June 2018 Grill Class Tags Summer, Orzo, Pancetta, Feta, Lemon, Basil, Walnuts, Salad
Comment

Grilled Rosemary Lemon Chicken Brochettes

June 25, 2018 Nancy Madok
chix cover.jpg

Ingredients

3 lbs. boneless, skinless chicken thighs
2 tsp. fresh rosemary, finely chopped
2 cloves garlic, crushed
1T lemon zest
¼ cup lemon juice
¼ cup olive oil
Salt & pepper

1.    Cut the chicken thighs into 1½-inch pieces. Place them into a medium-size bowl and set aside.

chix2.jpg

2.    In a large bowl, add the rosemary, garlic, lemon zest, juice, and olive oil. Mix until combined. Add the chicken and toss until well coated.  Refrigerate for 1-2 hours (no more than 2 hours).

3.    Preheat your BBQ Grill to medium/medium-high.

4.    Remove the chicken from refrigerator. Pour off any remaining marinade. Thread the chicken onto the skewers, making sure not to overcrowd the chicken pieces. Using a paper towel, pat the chicken dry.  Season with salt and pepper.


5.    Place the chicken on the hot grill. Close the lid. Grill the chicken to 5-8 minutes on one side to get a nice brown color. Open the lid, turn the skewers, and close the lid for about 5 minutes. Repeat until chicken is golden brown and cooked*. Total cooking time is about 12-15 minutes on “medium” heat.                                    

* Note you may need to remove the pieces of meat at the tip first, as they may cook faster than the pieces near the handle. Slide the pieces near the handle toward the tip as the tip pieces are removed.


6.    Remove the meat from skewers and place on a platter. Serve warm. 


TIPS & TRICKS

•    I remove any large pieces of fat from the thighs, but don’t remove all of it. It adds flavor and will be rendered off in the cooking process.
•    Don’t marinade the cubes thigh meat more than 2 hours because the lemon juice will start to “cook” the chicken, making the flesh mushy.
•    If you wish you can keep the thighs whole. Just marinade and grill them.
•    A little fresh rosemary goes a long way. 
•    This chicken is fantastic cold. You can add it to a green salad, pasta, or even to the orzo salad recipe from this class.


In June 2018 Grill Class Tags Summer, grill, Rosemary, Chicken, Brochettes, Lemon
Comment

Blood Orange & Lemon Curd Tart

April 1, 2017 Nancy Madok
tart cover.jpg
tart ingred.jpg

Ingredients

Pastry:
12T room temperature butter cut into cubes
½ cup granulated sugar
2 egg yolks
2 cups all purpose flour
¼ tsp. salt

Lemon Curd:
zest of 2 lemons
½ cup lemon juice
2 egg yolks
3 eggs
1/3 cup granulated sugar
8T room temperature butter, cut into cubes

Tart:
4T apricot jelly
2T water
3-4 blood oranges or regular navel 

Dough: 

1.    In the bowl of your mixer with the paddle attachment on low speed cream the butter and sugar together until fluffy, about 1 minute. Scrape down the sides of the bowl.  

2.    Add the egg yolks and mix till combined, scrape down the sides of the bowl again then add the flour and salt; mix just until the mixture  start to come together. 


3.    Be careful not to over mix. 


4.    Use your hands to gather the dough and form into a ball.


5.    Divide the dough into half and place in a 10-inch removable bottom tart pan. Using your fingers press the dough into the bottom of the pan. . 


6.    Then press the into the sides. Add more dough as needed, making sure to keep an even thickness.  

tart7.jpg

7.    You might not use all the dough. ( the little extra can be cooked off as a small cookie) Cover the tart pan and place in refrigerator of at least 1hour.  


tart8.jpg

8.    Pre heat the oven to 375ºF. Remove the tart pan from refrigerator. Line tart pan with parchment or aluminum foil pressing it into the edges. Fill the tart pan with pie weights and place immediately into oven.


9.    Bake at 375º F for 20 minutes.  Remove the tart from the oven, take out the pie weights and the parchment and return to the oven for an additional 5-10 minutes, until golden brown.  Remove from oven and let cool.  


Lemon Curd:
 

10.    In a small saucepan over low heat, whisk the lemon zest, juice, eggs yolks, eggs, and sugar until combined. 


11.    Stir in the butter, stirring constantly until the mixture thickens, about 5-8 minutes. 

tart12.jpg

12.    It should thicken enough to hold a line when draw with finger on a wooden spoon.


13.    Remove from the heat and strain into a clean bowl.


14.    Cover with a piece of plastic wrap, pressing it directly on top of the curd and let cool completely.


Tart:

15.    In a small saucepan, mix the jelly and the water over low heat until melted to make the glaze. Brush the glaze on to the bottom of the tart shell and let set for a few minutes.  Reserve the remaining glaze.

tart16.jpg

16.    Spread the lemon curd on the tart.  


17.    Using a small knife  cut off the top and bottom of the orange. Carefully move you knife from the top to the bottom of the orange removing the membrane and the peel. Then slice the orange into slices. Repeat with remaining oranges. 


18.    Arrange the orange slices in an attractive pattern on top of the lemon curd.  

tart19.jpg

19.    Lightly brush the remaining glaze on top of the fruit.  Serve immediately.


Tips & Tricks


•    The pastry can be baked 2 days in advanced. 
•    It can also be pressed into a tart pan and frozen uncooked for 3-4 months. I placed it in a giant zip lock bag. When ready to use. Preheat oven and place frozen tart pan directly into oven.  Bake for 20mins, or until golden brown. No need for pie weights. 
•    Use can use almost any fruit to top the tart; Berries, kiwi, stone fruit
•    Completed tart is best eaten within the day so that crust doesn’t get soggy. 


print recipe
Blood Orange & Lemon Curd Tart
by Nancy Madok October-10-2017
Blood Orange & Lemon Curd Tart
Ingredients
  • Pastry
  • 12T room temperature butter cut into cubes
  • 1/2 Cup Granulated sugar
  • 2 Egg Yolks
  • 2 Cups All Purpose Flour
  • 1/4 Tsp Salt
  • Lemon Curd
  • 2 Lemons Zest of Lemons
  • 1/2 Cup Lemon Juice
  • 2 Egg Yolks
  • 3 Eggs
  • 1/3 Cup Granulated Sugar
  • 8T Room Temp Butter, Cut into cubes
  • Tart
  • 4T Apricot Jelly
  • 2T Water
  • 4 Blood Oranges or regular Navel
Instructions
Dough: In the bowl of your mixer with the paddle attachment on low speed cream the butter and sugar together until fluffy, about 1 minute. Scrape down the sides of the bowl. Add the egg yolks and mix till combined, scrape down the sides of the bowl again then add the flour and salt; mix just until the mixture start to come together. Be careful not to over mix. Use your hands to gather the dough and form into a ball.Divide the dough into half and place in a 10-inch removable bottom tart pan. Using your fingers press the dough into the bottom of the pan. Then press the into the sides. Add more dough as needed, making sure to keep an even thickness. You might not use all the dough. ( the little extra can be cooked off as a small cookie) Cover the tart pan and place in refrigerator of at least 1hour. Pre heat the oven to 375ºF. Remove the tart pan from refrigerator. Line tart pan with parchment or aluminum foil pressing it into the edges. Fill the tart pan with pie weights and place immediately into oven. Bake at 375º F for 20 minutes. Remove the tart from the oven, take out the pie weights and the parchment and return to the oven for an additional 5-10 minutes, until golden brown. Remove from oven and let cool. Lemon Curd:In a small saucepan over low heat, whisk the lemon zest, juice, eggs yolks, eggs, and sugar until combined. Stir in the butter, stirring constantly until the mixture thickens, about 5-8 minutes. It should thicken enough to hold a line when draw with finger across the wooden spoonRemove from the heat and strain into a clean bowl. Cover with a piece of plastic wrap, pressing it directly on top of the curd and let cool completely.Tart:In a small saucepan, mix the jelly and the water over low heat until melted to make the glaze. Brush the glaze on to the bottom of the tart shell and let set for a few minutes. Reserve the remaining glaze. Spread the lemon curd on the tart shell. Using a small knife cut off the top and bottom of the orange. Carefully move you knife from the top to the bottom of the orange removing the membrane and the peel. Then slice the orange into slices. Repeat with remaining oranges. Arrange the orange slices in an attractive pattern on top of the lemon curd. Lightly brush the remaining glaze on top of the fruit. Serve immediately.TIPS and TRICKSThe pastry can be baked 2 days in advanced. It can also be pressed into a tart pan and frozen uncooked for 3-4 months. I placed it in a giant zip lock bag. When ready to use. Preheat oven and place frozen tart pan directly into oven. Bake for 20mins, or until golden brown. No need for pie weights. Use can use almost any fruit to top the tart; Berries, kiwi, stone fruit Completed tart is best eaten within the day so that crust doesn’t get soggy.
Details
Prep time: Cook time: Total time: 1 hour Yield: 8-10
Featured
Risotto with Mint, Peas & Pecorino Romano Cheese
rack cover.jpg
Rack of Lamb with Mint Chimichurri Sauce
Blood Orange & Lemon Curd Tart
In April 2017 Class Tags April 2017 Class, Dessert, Blood Oranges, Tart, Lemon, Spring
Comment

En Papillotes of Fish with Lemon & Greens

March 2, 2017 Nancy Madok
fish ingred..jpg

Ingredients

8 fish fillets, -6 oz. (salmon, halibut, Maui Maui, grouper or any firm fish)
salt, pepper
1 cup preserved lemons, medium diced
1 cup sundried tomatoes packed in oil, drained (reserve the oil) and julienne
2 shallots finely diced
4T chopped flat leaf parsley
2 cups white wine
4 cups baby spinach
2 cups arugula
1 medium head fennel, cored and thinly sliced
salt and pepper
parchment paper

fish1.jpg

1.    Preheat oven to 425° F.  Set two baking sheets aside.

2.    Fold 8 sheets of 20-inch long parchment paper in half to resemble a     book. Using scissor to cut each paper into a heart shape. Set aside.

3.    Place a fish fillet on one half of paper near the folded edge.

4.    Sprinkle with salt & pepper.


fish5.jpg

5.    Place on top of the fish one tablespoon each of the preserved lemon,  and the sundried tomatoes, a sprinkle of shallots and the chopped parsley

fish6.jpg

6.    Drizzle 3 tablespoon wine on top.

7.    Working from one corner closest to the fold, make a series of small  folds working around the edges of the parchment. Pressing firmly to  “seal “ in the fish.  Place the packet on a baking sheet.  Repeat with the  remaining fish.


8.    Place the baking sheets in a 425º F oven and cook for 12 minutes.

fish7.jpg

9.   When the fish is almost finished baking, in a small bowl, whisk together the lemon juice, and oil. Season with salt and pepper. In Medium bowl toss the spinach, arugula and fennel with the dressing (you may not use all of the vinaigrette; adjust to desired amount of coating of the greens).  Add salt and pepper, if needed

fish9.jpg
fish9a.jpg

10.  When the fish is done, Place each papillotes on a plate.  Cut or tear back the paper, place a spoon of greens on top of then fish. Cover with the paper and allow the greens to slightly wilt. Serve immediately.


TIPS AND TRICKS

•    Always roast 2 chickens. They make great leftovers. 
•    Trussing the chickens makes it cook more evenly and is easier to turn.
•    I remove the cooked rosemary sprigs before serving but stir the chopped cooked lemons into the vegetables. 


March 2017 CLASS
Preserved Lemons
Preserved Lemons
Winter Vegetable Soup with Pistou
En Papillotes of Fish with Lemon & Greens
Chocolate Cheesecake
In March 2017 Tags Fish, Papillotes, Lemon, Main, Winter
Comment

Roasted Chicken & Vegetables with Rosemary & Preserved Lemon

February 2, 2017 Nancy Madok
chix cover.jpg
chix ingred.(1).jpg

Ingredients

2 medium yellow onions
4-6 medium carrots
2 heads fennel, frons removed
1 pound Yukon gold potatoes, wash
Two chickens, about 4-5 pounds each
2 tsp each: sea salt and black pepper, mixed together
2 preserved lemons, flesh & skin cut into small dice ** recipe attached
several sprigs fresh rosemary
4T olive oil
1 cup chicken stock
kitchen twine


chix2.jpg

1.    Preheat oven to 425º F.
2.    Peel and cut the carrots into thick slices about 1inch thick and onions into quarters. Set aside.

chix3jpg.jpg

3.    Cut the potatoes and fennel into quarters Set aside. 


chix4.jpg

4.    Wash and pat dry chickens.  Rub the outside of bird with 2 tablespoons of olive oil.

chix5.jpg

5.    Carefully separate the skin from the breast meat; rub the salt & pepper mixture underneath the skin and all over the birds.  Place ¼ of 1 lemon and a sprig of rosemary under each side under the skin. Place the remaining ½ lemon and a sprig of rosemary in cavity.


chix6.jpg

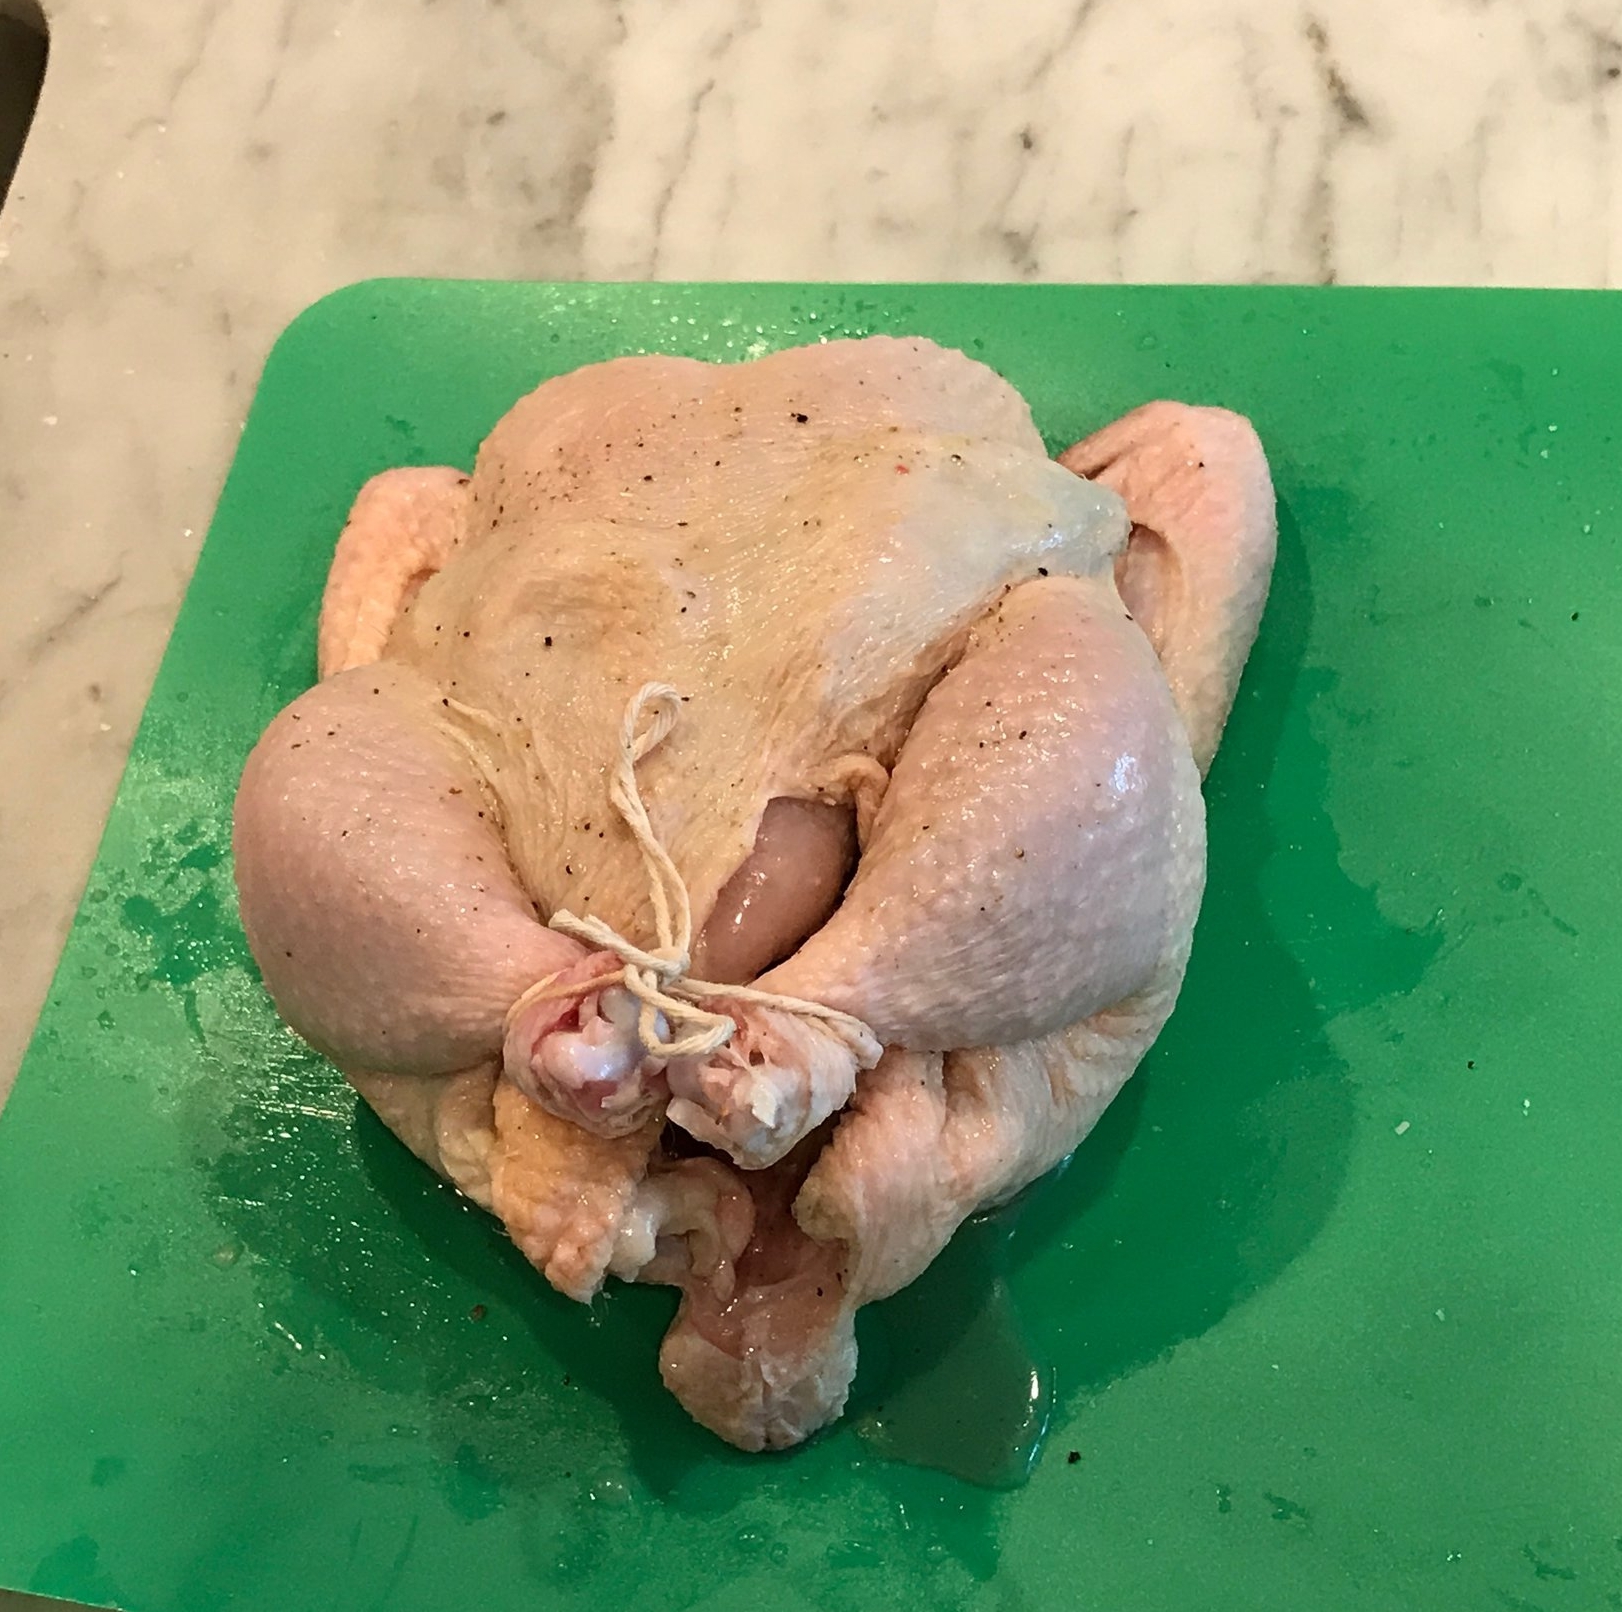
6.    Tuck the wings behind the “shoulders”. 

chix7e.jpg

7.    Truss with kitchen twine.  Repeat with the other chicken.


chix8jpg.jpg

8.    Lay the chickens on their tummy on a rack in roasting pan. Add stock and the vegetables to the pan and roast the chickens in 425º F oven for 20 minutes.  

9.    Turn chickens to their side, and roast for 20 minutes.  Turn chicken to other side, and roast for 20 minutes. 

10.     Place chicken on their backs, baste with juices, and roast for about 20 minutes more or until internal temperature is 170° F


chix10.jpg

11.    Transfer the chickens to a platter, cover loosely with foil, and let rest for 15 minutes.


chix11.jpg

12.    Carve the chicken and place on a plate or platter top with the roasted vegetables and pan drippings. 

TIPS AND TRICKS

•    Always roast 2 chickens. They make great leftovers. 
•    Trussing the chickens makes it cook more evenly and is easier to turn.
•    I remove the cooked rosemary sprigs before serving but stir the chopped cooked lemons into the vegetables. 


FEBRUARY 2017 CLASS
Wintergreens with Roasted Beets, Fennel & Gorgonzola with Apple Cider Vinaigrette
Roasted Chicken & Vegetables with Rosemary & Preserved Lemon
Apple & Walnut Crostata
Lemon Preserve Recipe
Preserved Lemons
Preserved Lemons
In February 2017 Class Tags February 2017 Class, Main, Vegetables, Rosemary, Lemon, Winter, preserved lemons, Chicken
Comment

PRIVACY POLICY 2020

COPYRIGHT 2020 Cucina Casa M