• UnderConstruction
  • Home
  • Seasons
  • Classes
  • Tours
  • About
  • CONTACT
  • Menus
Menu

Cucina Casa M

Street Address
City, State, Zip
Phone Number

Your Custom Text Here

Cucina Casa M

  • UnderConstruction
  • Home
  • Seasons
  • Classes
  • Tours
  • About
  • CONTACT
  • Menus

Risotto with Mint, Peas & Pecorino Romano Cheese

April 3, 2017 Nancy Madok

Ingredients

4T olive oil
   1 medium yellow onion, finely diced
   1 leek, finely diced
   2 clove garlic, crushed
   ½ cup white wine
   14 ounces Arborio rice (2 cups)
   7 cups chicken or vegetable stock, heated
   1 cup fresh or frozen petite peas
   ½ cup grated Pecorino Romano cheese(more for serving)
   2 tsp. chopped mint
   1 tsp. lemon zest
   2T chopped flat parsley
   salt & pepper


1.    In a large sauté pan, over medium heat, add the olive oil; when warm add the onion and leek and sauté 3-4 minutes until they start to soften.  Add the garlic and sauté gently for 1 minute more.  Add the wine and continue stirring until the wine has almost disappeared.


2.    Add the rice and sauté 1 minute, stirring constantly. 

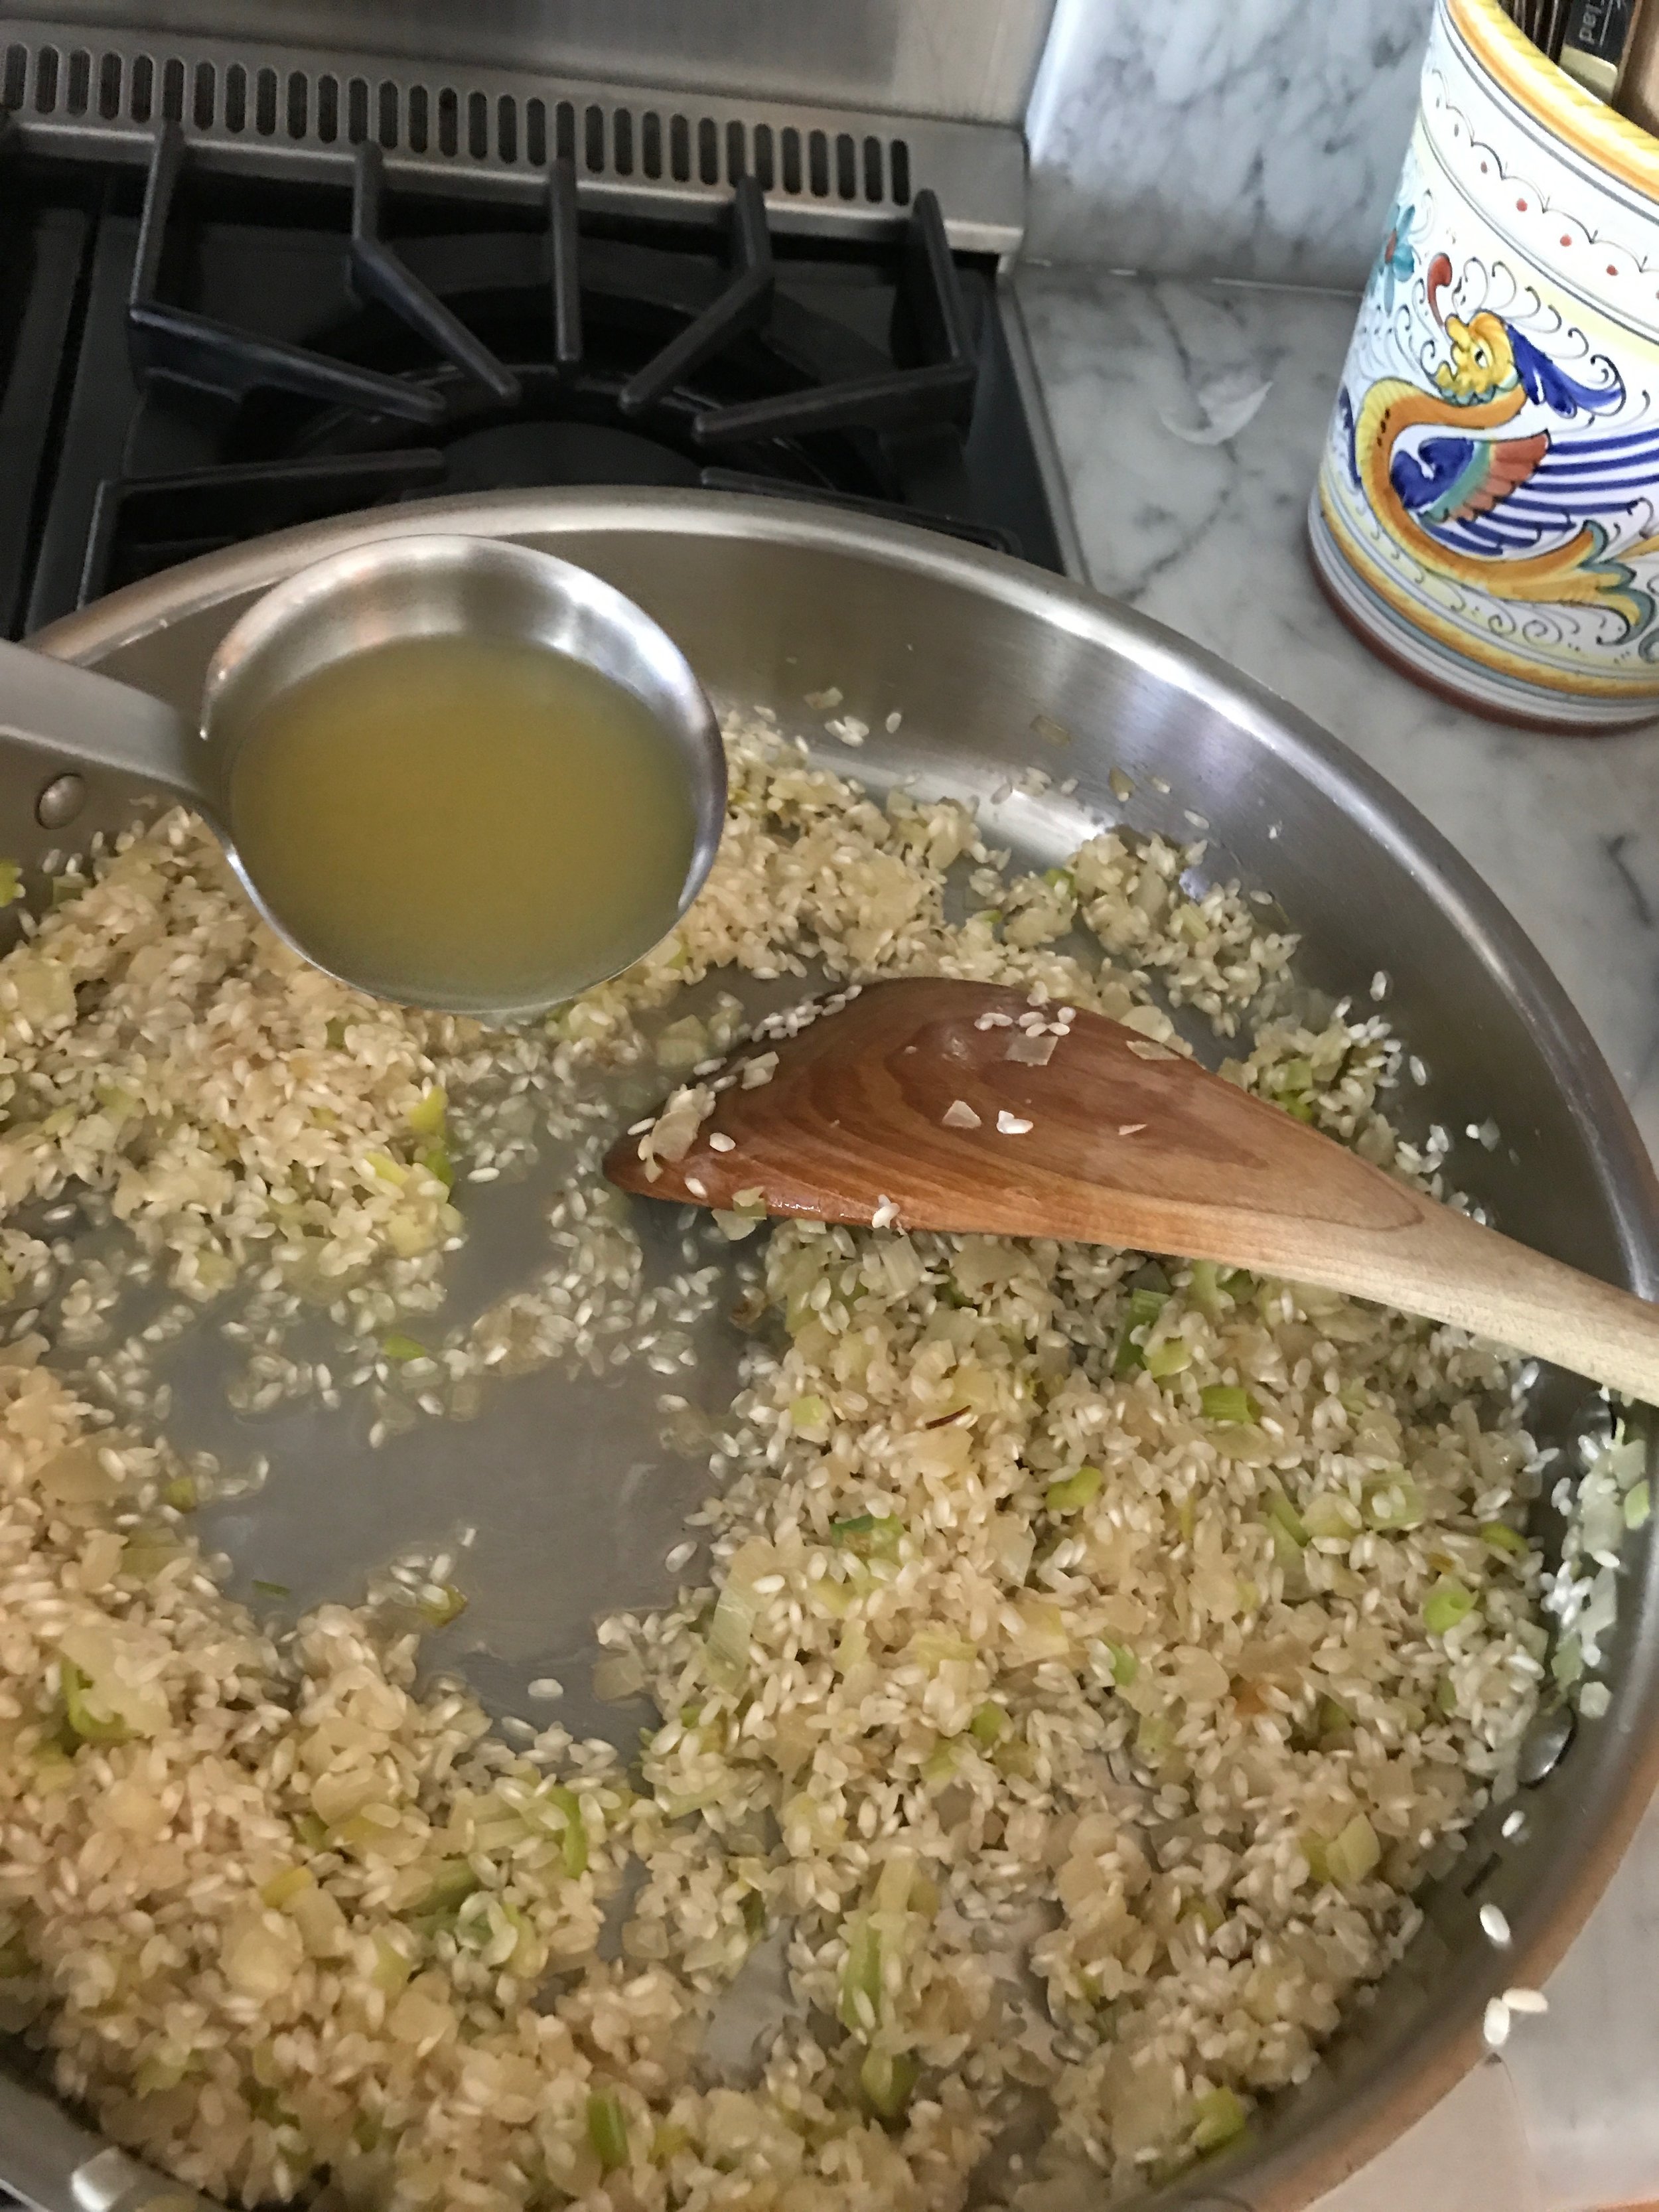
3.    While stirring, add one ladle of stock.  


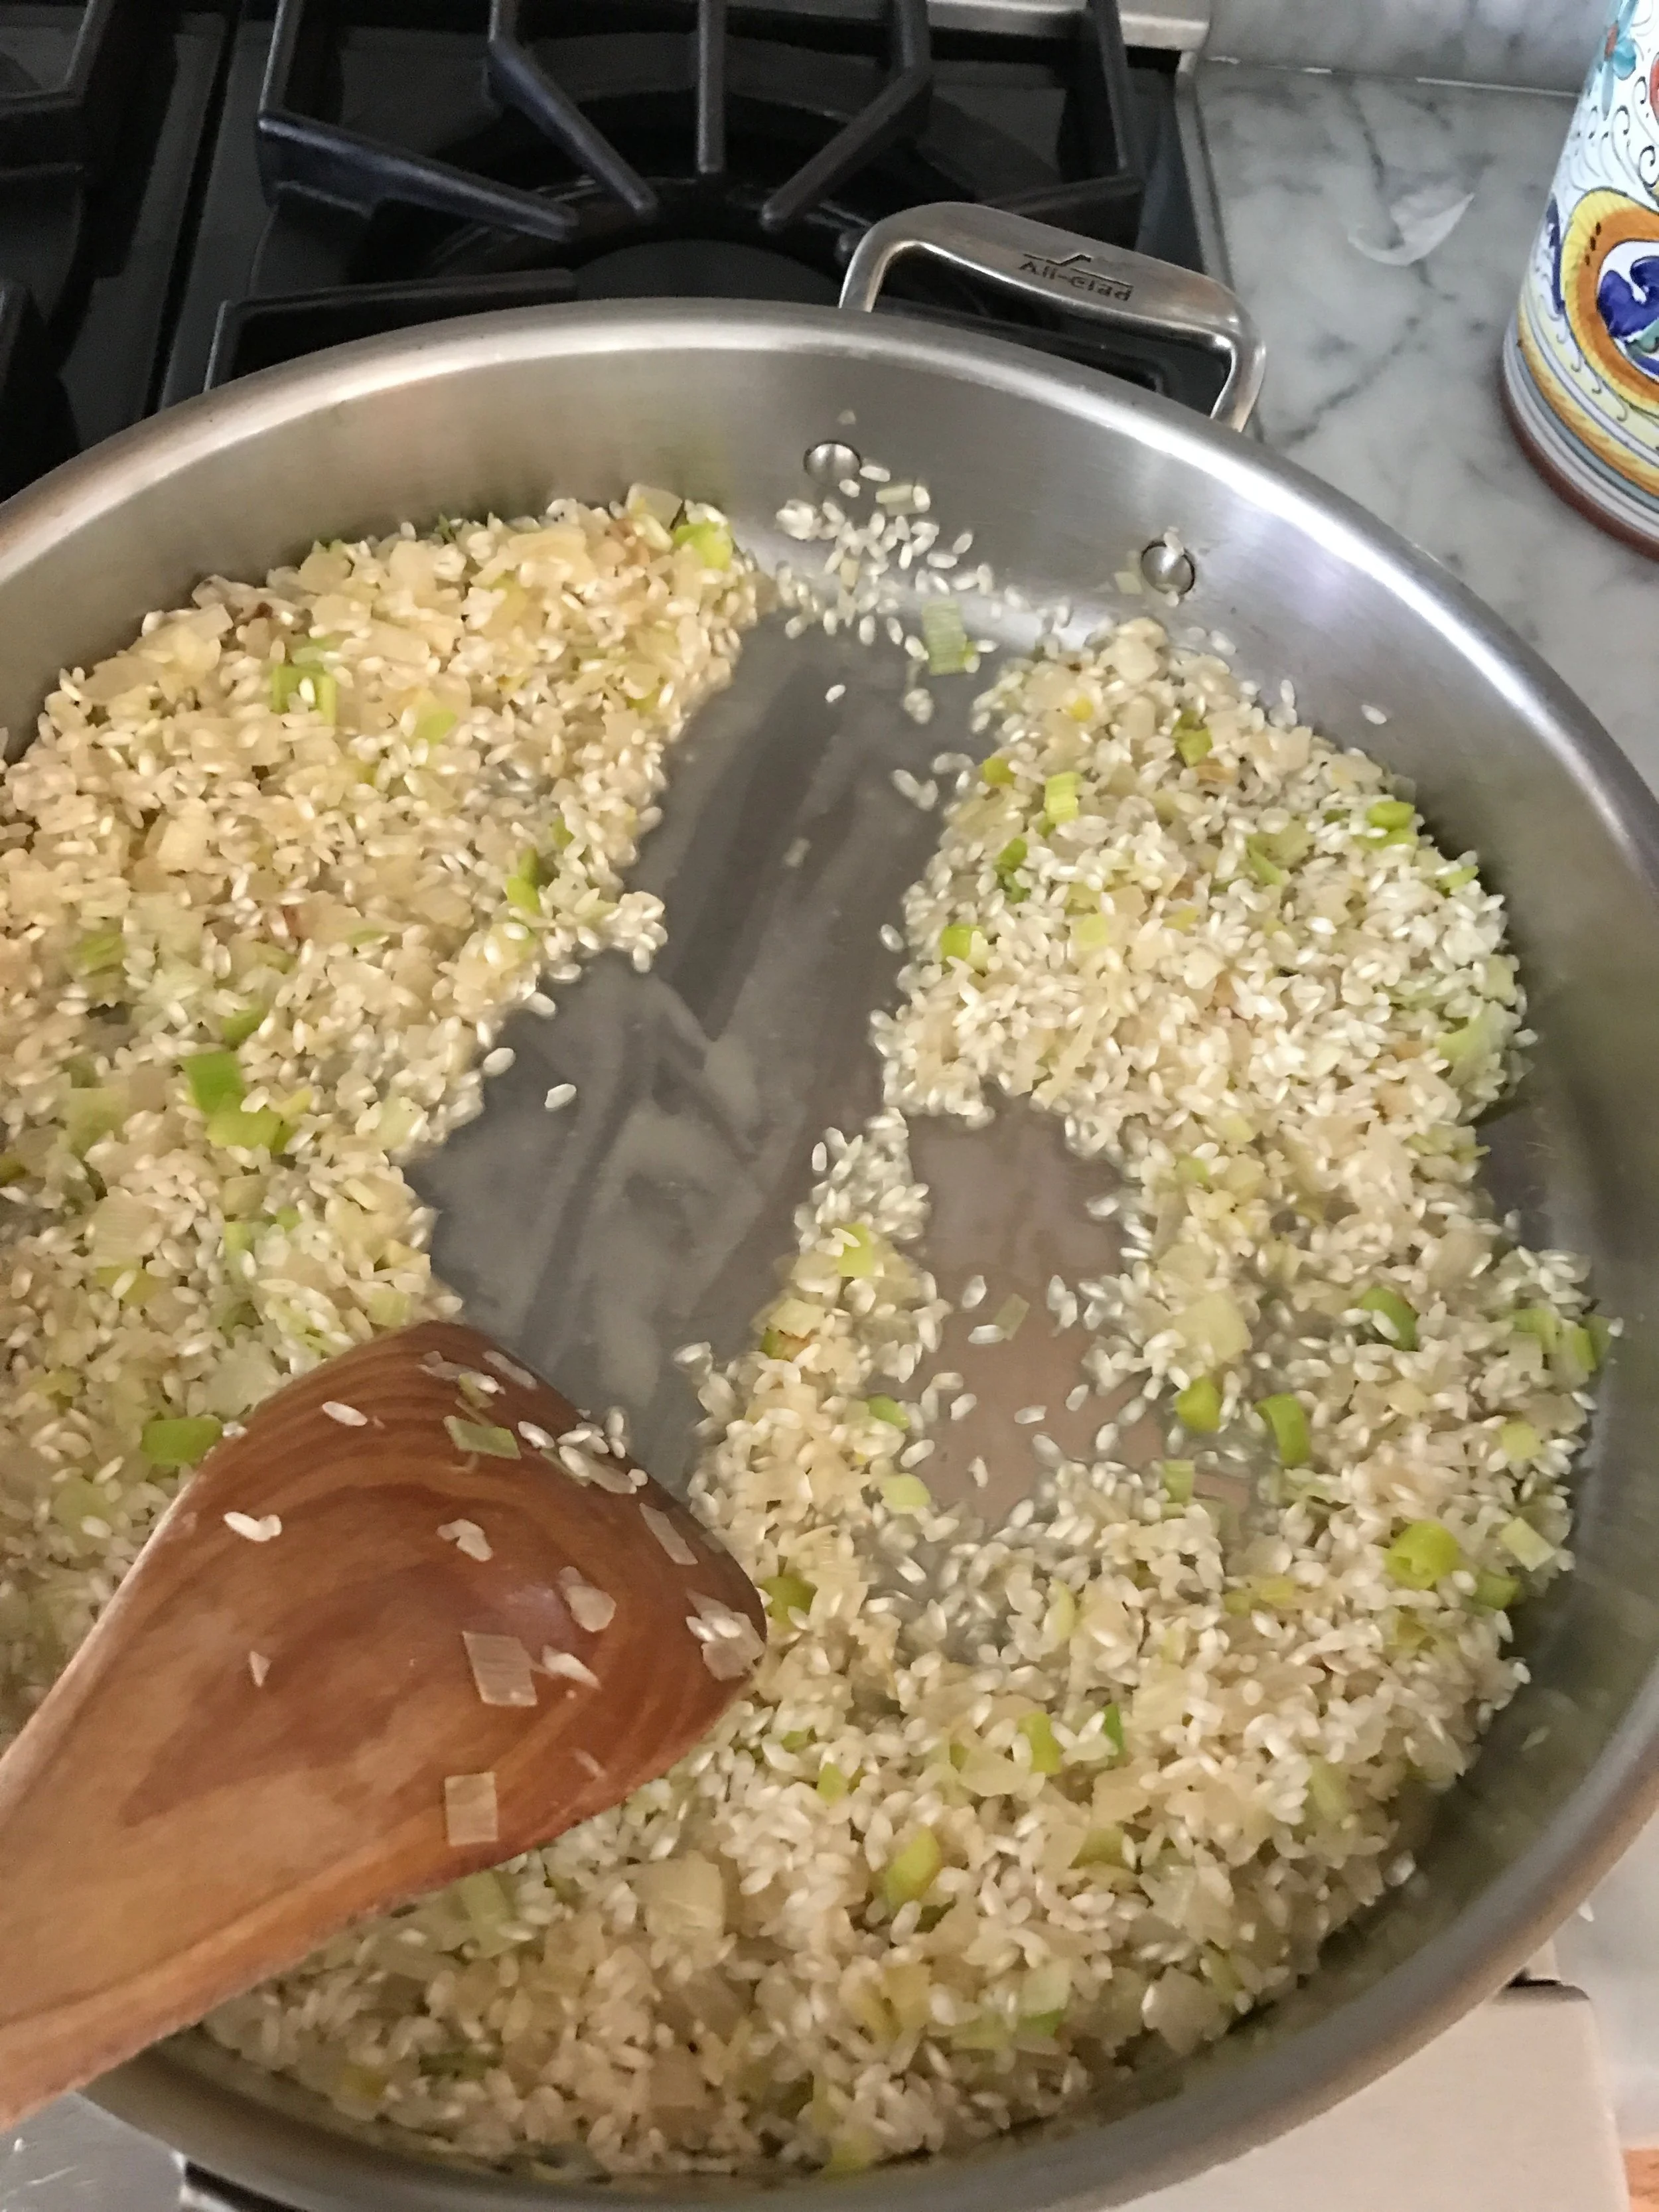
4.    When the stock has disappeared, ( and you can draw a line in the rice) add another ladle of stock. 

5.    Continue adding stock one ladle at a time until the rice is cooked; about 20 minutes (you may not need all the stock). 

risotto7.jpg

6.    Add the peas and stir until well incorporated into the rice.

7.    Remove from the heat and, add the cheese, mint, lemon zest, and parsley.

risotto9.jpg

8.    Season with salt and pepper.  Serve immediately with extra cheese


Tips & Tricks

•    When washing the leeks cut it in half. Place the root end under running water (Like your giving the leek a shower) Carefully separate each layer letting the water pass though and remove any dirt and sand
•    For the freshest cheese buy a wedge. Cut into small cubes and grate it in your food processor or blender. Then store it in a glass jar in the refrigerator.
•    You can substitute the peas and mint for sautéed mushrooms & thyme for a totally different dish.


Featured
Risotto with Mint, Peas & Pecorino Romano Cheese
rack cover.jpg
Rack of Lamb with Mint Chimichurri Sauce
Blood Orange & Lemon Curd Tart
In April 2017 Class Tags April 2017 Class, appetizer, Risotto, Mint, Peas, Pecorino Romano Cheese, Pasta, Spring
Comment

Rack of Lamb with Mint Chimichurri Sauce

April 2, 2017 Nancy Madok
rack cover.jpg
rack1.jpg

Ingredients

Rub:
4 cloves garlic
2 cups loosely packed parsley leaves
1 cup mint leaves
4 teaspoons grated lemon zest
2T mustard
4T olive oil
4 racks of lamb, about 1½  pounds each
salt & pepper

Sauce:
4 cloves garlic
2 stalks green onion, cut into pieces
1½ cups parley leaves
½ cup mint leaves
1 tsp. lemon zest
½ cup lemon juice
½ cup olive oil
salt & pepper


1.    Preheat the oven to 450º F.

rack2.jpg

2.    Rub: In the bowl of the food processor while running add the garlic, then add the parsley and mint, and pulse until finely chopped.  Add the lemon zest, mustard, and olive oil and pulse until combined.  Set aside.


rack3.jpg

3.    Place the racks of lamb on a rimed baking sheet fat side up, and bones toward the center of the pan.  Sprinkle with salt and pepper.  Rub the lamb with the herb rub mixture from Step 2

4. Place the pan in the center rack of a 450º F oven and roast the lamb for 25 minutes.

rack4.jpg
rack 5.jpg

5. Remove the lamb from the oven and cover loosely with aluminum foil. Let rest for 15 minutes.  Then cut the racks into either single or double chops and serve with sauce.

Sauce:

rack 6.jpg

6. In a bowl of your food processor, while running, add the garlic, green onion, parsley and mint; pulse just until rough chopped.  Add the lemon zest, juice and olive oil.  Pulse just until combined.  Season with salt and pepper.

rack7.jpg

7. Transfer to serving bowl.  Serve with the lamb.


Tips & Tricks

•    Having the food processor running before you add your ingredients gives your food a nice fine chopped appearance.
•    The rub can be made a day ahead.  The herb mixture doesn’t need to cover the whole rack. Keep it on the thick meat part of the rack.
•    Sauce can be used with beef and chicken. Will keep in refrigerator 2-3 days.

Featured
Risotto with Mint, Peas & Pecorino Romano Cheese
rack cover.jpg
Rack of Lamb with Mint Chimichurri Sauce
Blood Orange & Lemon Curd Tart
In April 2017 Class Tags April 2017 Class, Main, Lamb, Mint, Chimichurri Sauce, Spring
Comment

Blood Orange & Lemon Curd Tart

April 1, 2017 Nancy Madok
tart cover.jpg
tart ingred.jpg

Ingredients

Pastry:
12T room temperature butter cut into cubes
½ cup granulated sugar
2 egg yolks
2 cups all purpose flour
¼ tsp. salt

Lemon Curd:
zest of 2 lemons
½ cup lemon juice
2 egg yolks
3 eggs
1/3 cup granulated sugar
8T room temperature butter, cut into cubes

Tart:
4T apricot jelly
2T water
3-4 blood oranges or regular navel 

Dough: 

1.    In the bowl of your mixer with the paddle attachment on low speed cream the butter and sugar together until fluffy, about 1 minute. Scrape down the sides of the bowl.  

2.    Add the egg yolks and mix till combined, scrape down the sides of the bowl again then add the flour and salt; mix just until the mixture  start to come together. 


3.    Be careful not to over mix. 


4.    Use your hands to gather the dough and form into a ball.


5.    Divide the dough into half and place in a 10-inch removable bottom tart pan. Using your fingers press the dough into the bottom of the pan. . 


6.    Then press the into the sides. Add more dough as needed, making sure to keep an even thickness.  

tart7.jpg

7.    You might not use all the dough. ( the little extra can be cooked off as a small cookie) Cover the tart pan and place in refrigerator of at least 1hour.  


tart8.jpg

8.    Pre heat the oven to 375ºF. Remove the tart pan from refrigerator. Line tart pan with parchment or aluminum foil pressing it into the edges. Fill the tart pan with pie weights and place immediately into oven.


9.    Bake at 375º F for 20 minutes.  Remove the tart from the oven, take out the pie weights and the parchment and return to the oven for an additional 5-10 minutes, until golden brown.  Remove from oven and let cool.  


Lemon Curd:
 

10.    In a small saucepan over low heat, whisk the lemon zest, juice, eggs yolks, eggs, and sugar until combined. 


11.    Stir in the butter, stirring constantly until the mixture thickens, about 5-8 minutes. 

tart12.jpg

12.    It should thicken enough to hold a line when draw with finger on a wooden spoon.


13.    Remove from the heat and strain into a clean bowl.


14.    Cover with a piece of plastic wrap, pressing it directly on top of the curd and let cool completely.


Tart:

15.    In a small saucepan, mix the jelly and the water over low heat until melted to make the glaze. Brush the glaze on to the bottom of the tart shell and let set for a few minutes.  Reserve the remaining glaze.

tart16.jpg

16.    Spread the lemon curd on the tart.  


17.    Using a small knife  cut off the top and bottom of the orange. Carefully move you knife from the top to the bottom of the orange removing the membrane and the peel. Then slice the orange into slices. Repeat with remaining oranges. 


18.    Arrange the orange slices in an attractive pattern on top of the lemon curd.  

tart19.jpg

19.    Lightly brush the remaining glaze on top of the fruit.  Serve immediately.


Tips & Tricks


•    The pastry can be baked 2 days in advanced. 
•    It can also be pressed into a tart pan and frozen uncooked for 3-4 months. I placed it in a giant zip lock bag. When ready to use. Preheat oven and place frozen tart pan directly into oven.  Bake for 20mins, or until golden brown. No need for pie weights. 
•    Use can use almost any fruit to top the tart; Berries, kiwi, stone fruit
•    Completed tart is best eaten within the day so that crust doesn’t get soggy. 


print recipe
Blood Orange & Lemon Curd Tart
by Nancy Madok October-10-2017
Blood Orange & Lemon Curd Tart
Ingredients
  • Pastry
  • 12T room temperature butter cut into cubes
  • 1/2 Cup Granulated sugar
  • 2 Egg Yolks
  • 2 Cups All Purpose Flour
  • 1/4 Tsp Salt
  • Lemon Curd
  • 2 Lemons Zest of Lemons
  • 1/2 Cup Lemon Juice
  • 2 Egg Yolks
  • 3 Eggs
  • 1/3 Cup Granulated Sugar
  • 8T Room Temp Butter, Cut into cubes
  • Tart
  • 4T Apricot Jelly
  • 2T Water
  • 4 Blood Oranges or regular Navel
Instructions
Dough: In the bowl of your mixer with the paddle attachment on low speed cream the butter and sugar together until fluffy, about 1 minute. Scrape down the sides of the bowl. Add the egg yolks and mix till combined, scrape down the sides of the bowl again then add the flour and salt; mix just until the mixture start to come together. Be careful not to over mix. Use your hands to gather the dough and form into a ball.Divide the dough into half and place in a 10-inch removable bottom tart pan. Using your fingers press the dough into the bottom of the pan. Then press the into the sides. Add more dough as needed, making sure to keep an even thickness. You might not use all the dough. ( the little extra can be cooked off as a small cookie) Cover the tart pan and place in refrigerator of at least 1hour. Pre heat the oven to 375ºF. Remove the tart pan from refrigerator. Line tart pan with parchment or aluminum foil pressing it into the edges. Fill the tart pan with pie weights and place immediately into oven. Bake at 375º F for 20 minutes. Remove the tart from the oven, take out the pie weights and the parchment and return to the oven for an additional 5-10 minutes, until golden brown. Remove from oven and let cool. Lemon Curd:In a small saucepan over low heat, whisk the lemon zest, juice, eggs yolks, eggs, and sugar until combined. Stir in the butter, stirring constantly until the mixture thickens, about 5-8 minutes. It should thicken enough to hold a line when draw with finger across the wooden spoonRemove from the heat and strain into a clean bowl. Cover with a piece of plastic wrap, pressing it directly on top of the curd and let cool completely.Tart:In a small saucepan, mix the jelly and the water over low heat until melted to make the glaze. Brush the glaze on to the bottom of the tart shell and let set for a few minutes. Reserve the remaining glaze. Spread the lemon curd on the tart shell. Using a small knife cut off the top and bottom of the orange. Carefully move you knife from the top to the bottom of the orange removing the membrane and the peel. Then slice the orange into slices. Repeat with remaining oranges. Arrange the orange slices in an attractive pattern on top of the lemon curd. Lightly brush the remaining glaze on top of the fruit. Serve immediately.TIPS and TRICKSThe pastry can be baked 2 days in advanced. It can also be pressed into a tart pan and frozen uncooked for 3-4 months. I placed it in a giant zip lock bag. When ready to use. Preheat oven and place frozen tart pan directly into oven. Bake for 20mins, or until golden brown. No need for pie weights. Use can use almost any fruit to top the tart; Berries, kiwi, stone fruit Completed tart is best eaten within the day so that crust doesn’t get soggy.
Details
Prep time: Cook time: Total time: 1 hour Yield: 8-10
Featured
Risotto with Mint, Peas & Pecorino Romano Cheese
rack cover.jpg
Rack of Lamb with Mint Chimichurri Sauce
Blood Orange & Lemon Curd Tart
In April 2017 Class Tags April 2017 Class, Dessert, Blood Oranges, Tart, Lemon, Spring
Comment

PRIVACY POLICY 2020

COPYRIGHT 2020 Cucina Casa M