• UnderConstruction
  • Home
  • Seasons
  • Classes
  • Tours
  • About
  • CONTACT
  • Menus
Menu

Cucina Casa M

Street Address
City, State, Zip
Phone Number

Your Custom Text Here

Cucina Casa M

  • UnderConstruction
  • Home
  • Seasons
  • Classes
  • Tours
  • About
  • CONTACT
  • Menus

Pork Tenderloin stuffed with Spinach, Ham, & Cheese

December 19, 2019 Nancy Madok
pork:cover.jpg
pork:ingred.jpg

Ingredients

2T Butter
1 shallot, finely chopped
1 pound baby spinach, washed, drained and slightly damp
3T olive oil
2 pork tenderloin, approx 1 ½ lb each
10 slices prosciutto d’ Parma
1 cup Parmigano-Reggiano cheese, sliced with a potato peeler into curls
salt & pepper
butcher twine
1 cup chicken stock

pork#1.jpg
pork#1a.jpg

1. Spinach: In a large pan with a lid over medium heat, add the butter; when warm, add the shallots and sauté for about 2-3 minutes, or until they just begin to soften. Add the spinach, toss, then cover with the lid and cook for 2-3 minutes.

pork#2.jpg
pork#2a.jpg

2. Remove the lid and turn the heat to medium-high. Toss the spinach for another 1-2 minutes until the greens are wilted. Season with salt and 4-5 twists of pepper.

3. Remove the spinach from pan and place in a colander lined with a clean kitchen towel. Allow the spinach to cool slightly, Twist the spinach in the towel and using your hands squeeze out any excess water. Then chop then spinach finely and set aside.

4. Pre heat the oven to 400º F.

5. Pork: Place one of the pork tenderloins onto a cutting board. Slip your boning knife under the shiny silver skin and remove it from the meat. There is no need to remove the little bits of fat.

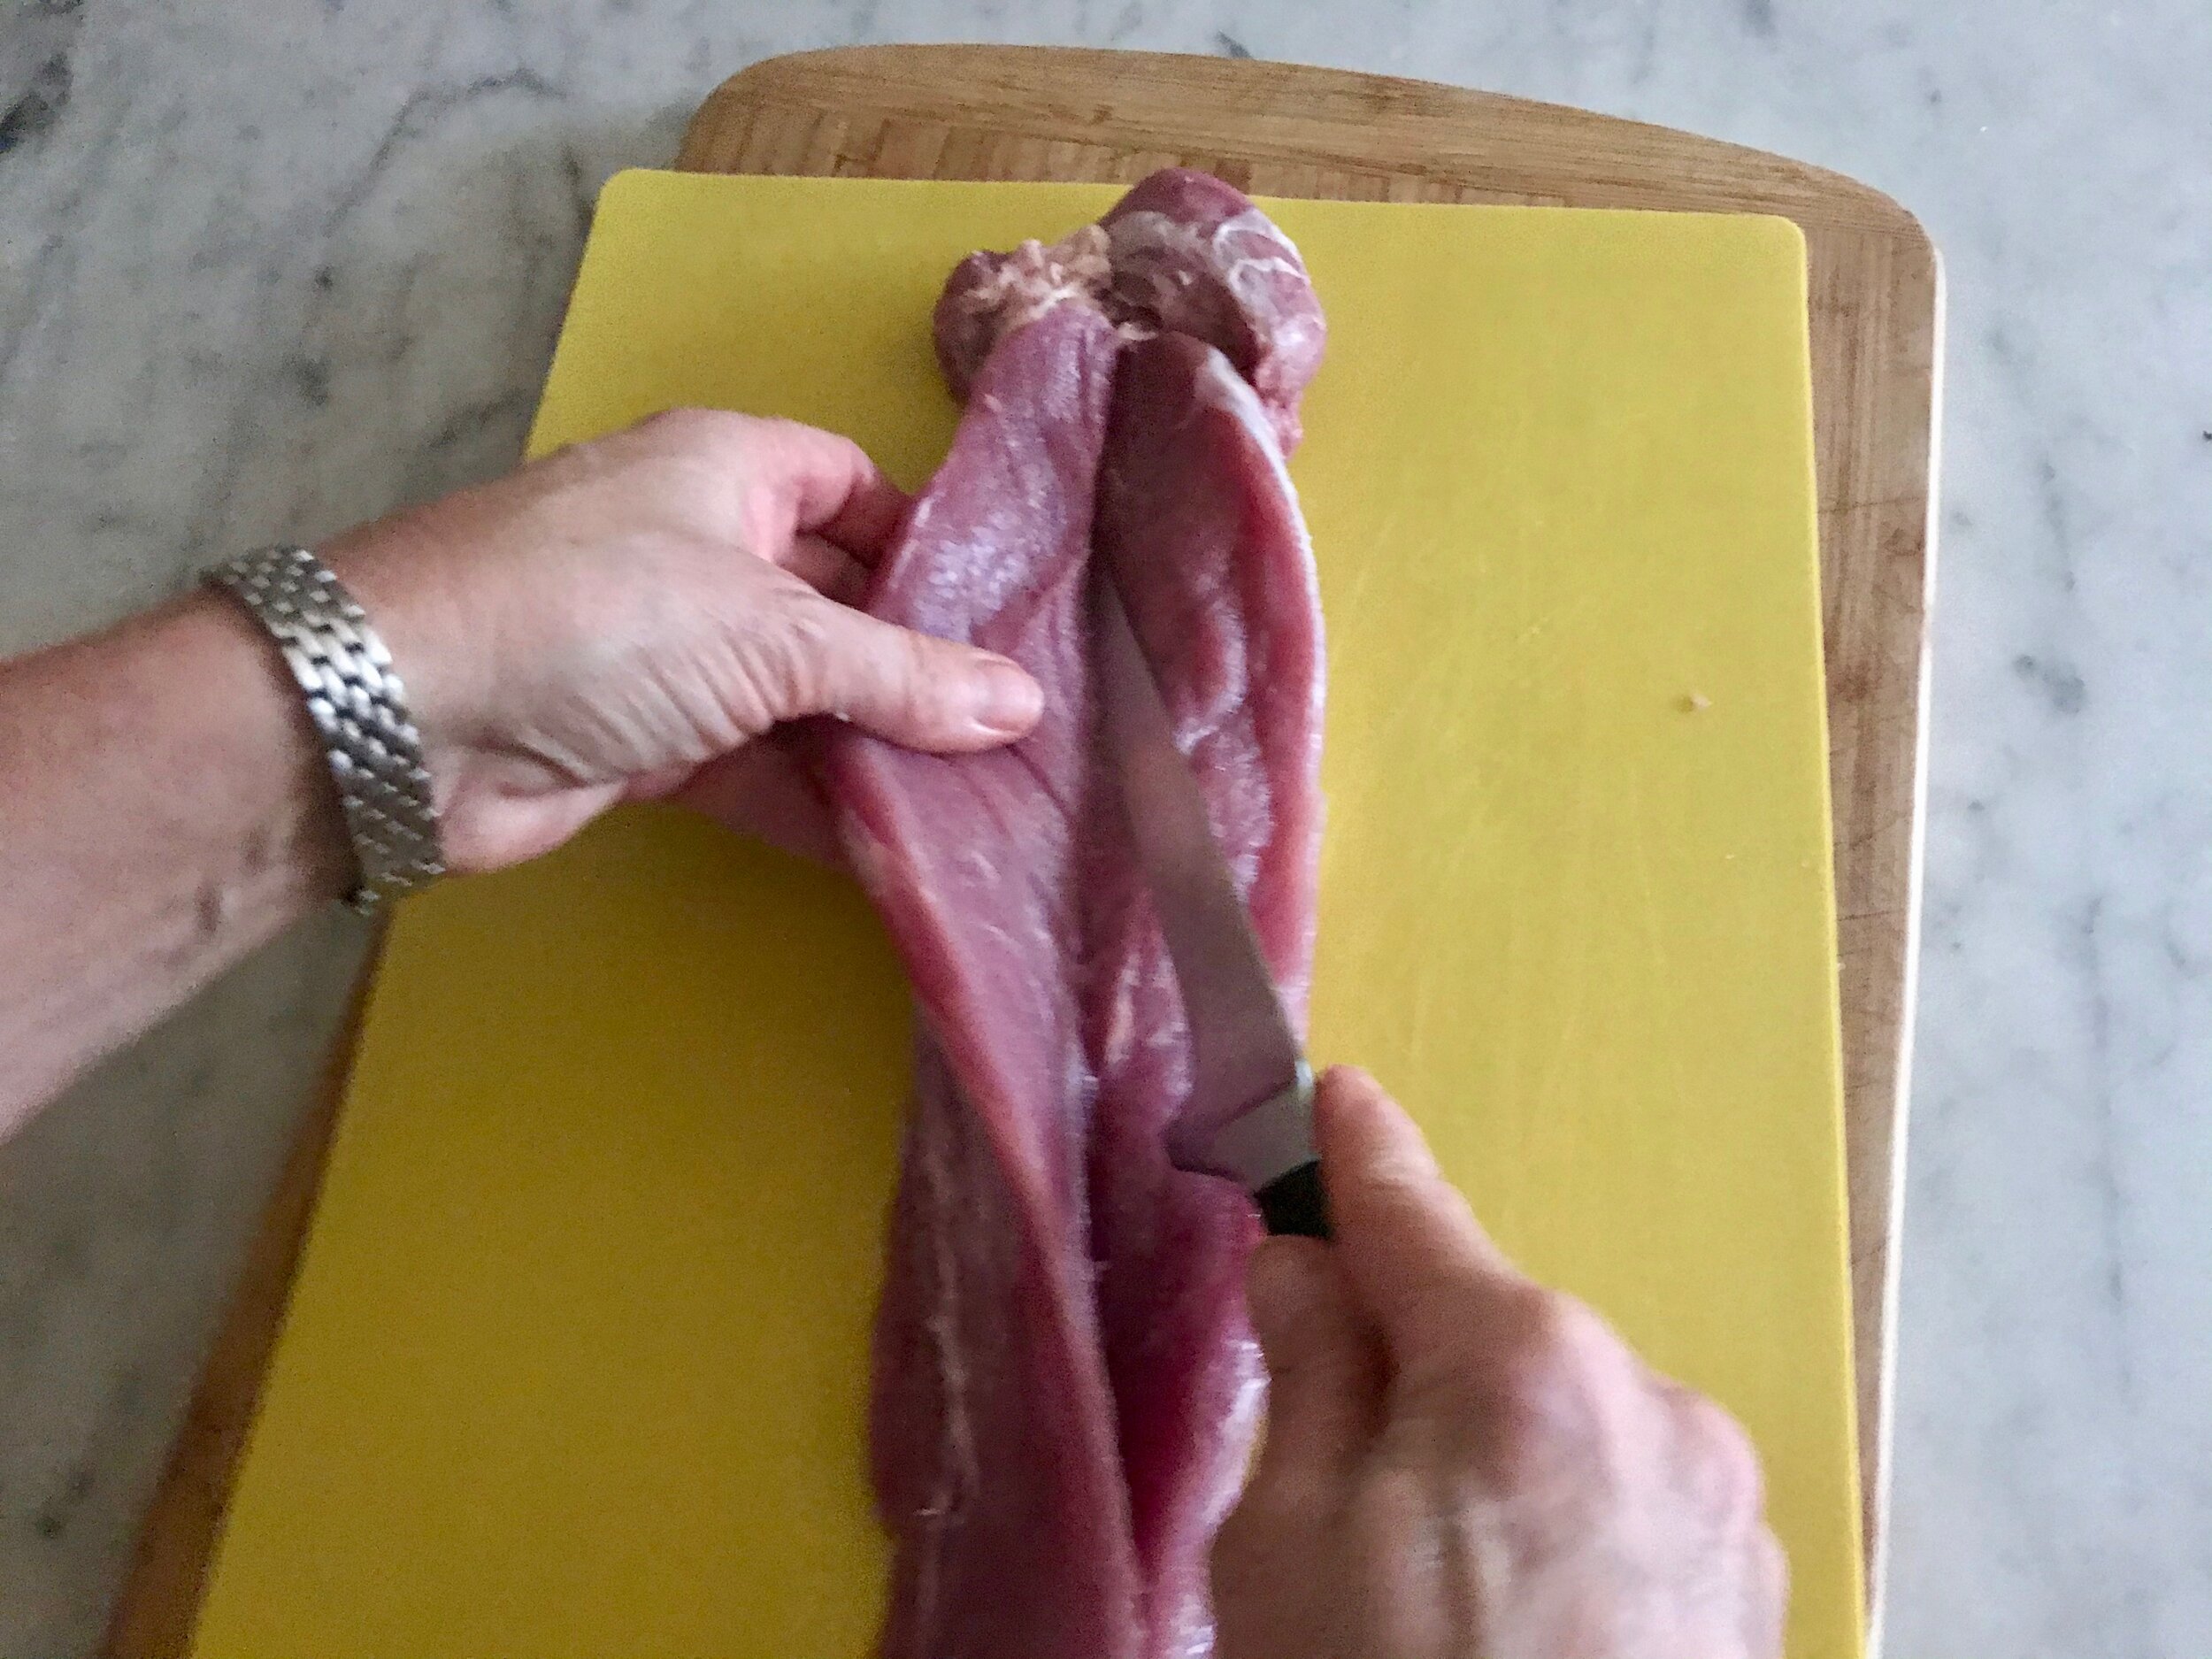
6. Holding the knife parallel to the tenderloin, make a cut though the center, but not going all the way though to the other side. The pork will fold open like a book. Flip the meat over and place a piece of plastic wrap on top and gently pound the tenderloin out until you reach an over all thickness of ¼ inch. Set aside and repeat to the other tenderloin.

pork#7.jpg

7. Lay the pounded tenderloin back on the cutting board. Place 5 of the prosciutto slices on top of the pork, over lapping slightly as you go.

pork#8.jpg

8. Place one half of the spinach mixture evenly down the center of the loin; top with one half of the cheese.

pork#9.jpg
pork#6d.jpg

9. Carefully roll the tenderloin up. Use butcher twine to secure it closed. Repeat with other tenderloin. Season the outside with salt & pepper.

10. Place a large ovenproof skillet on the stove on medium-high heat. Add the 3 tablespoons of olive oil. Once the oil is very hot, add the tenderloins. Sear each side of tenderloin until golden brown; about 2-3 minutes a side.

11. Carefully place the skillet into the 400º F oven and roast until the internal temperature reaches135-140º F inside, about 15-20 minutes, depending on the thickness of the tenderloin.

12. Transfer the meat to a carving board; loosely tent with aluminum foil and let rest for 10-15 minutes.

13. While the meat is rest place the pan on the stove over medium -high heat. CAREFUL THE HANDLE IS HOT!! Add the chicken stock and deglaze the pan scraping the bottom to get all the brown bits. Set aside.

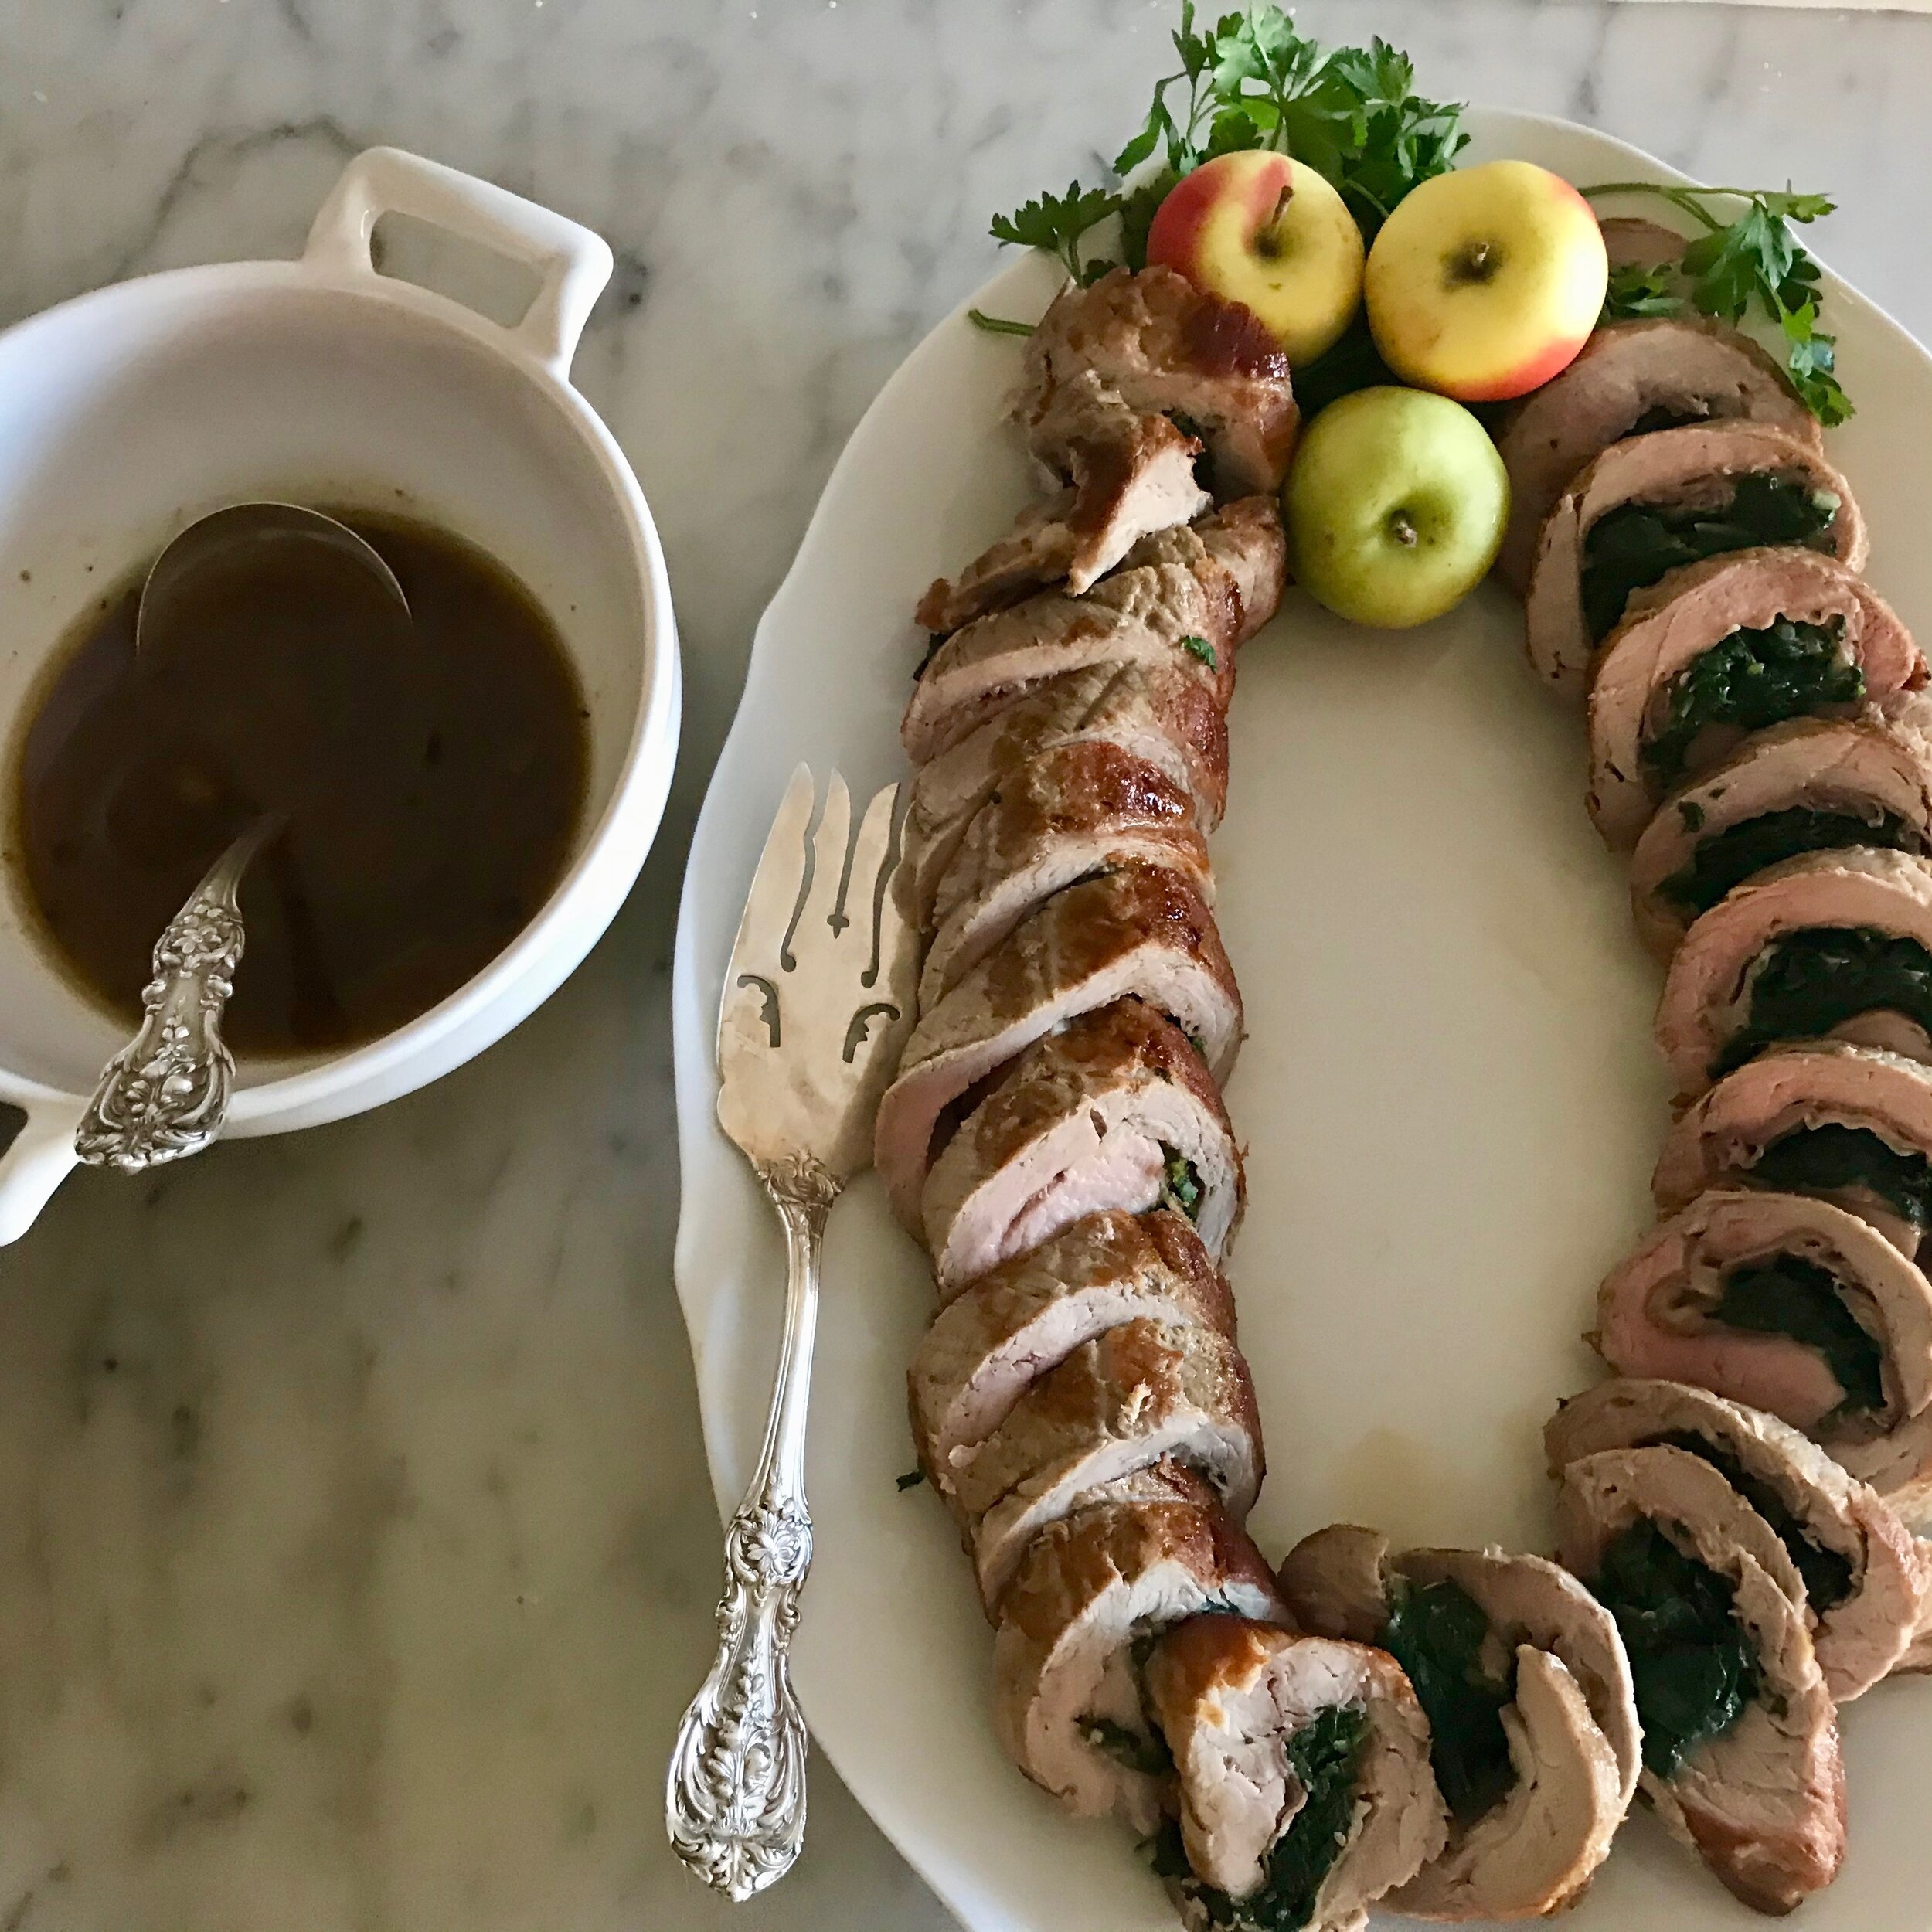
14. Remove the string and slicing the tenderloin, place on a plate or platter. Spoon the pan sauce on top of the meat. Serve with the dauphinious potatoes.

TIPS & TRICKS

• Spinach can be sautéed a day or 2 in advance.
• The pork can be pounded the day ahead then assembled early in the morning of your party. Wrap the stuffed tenderloin in plastic or parchment. Pat dry with paper towels before searing to insure you get a beautiful brown sear.
• Left over pork makes a great lunch or sandwich.

DOWNLOAD STUFFED PORK TENDERLOIN RECIPE
In December 2019 Holiday Tags Winter, Fall, Main, meat, Pork, Tenderloin, Spinach, Ham, Parmigiano-Reggiano cheese, prosciutto
Comment

Candy Cane Cheesecake

December 19, 2019 Nancy Madok
cake:cover.jpg
cake: ingred.jpg

Ingredients

Crust:
1½ cups chocolate cookie crumbs
4oz butter, melted

Filling:
24 oz. cream cheese, room temperature
¾ cups granulated sugar
4 eggs
1 tsp. peppermint extract

Topping:
1 pint sour cream
2T granulated sugar
1 tsp. peppermint extract
¼ cup crushed candy canes

1. Pre-heat oven to 350° F.

2. Crust: In a small bowl, combine the chocolate cookie crumbs and the melted butter. Stir until the mixture comes together. Using your fingers, press the mixture into the bottom and sides of a 10-inch spring form pan. Set aside.

cake#3.jpg

3. Filling: In a large bowl of your mixer, add the cream cheese and sugar; beat at medium speed until creamy and smooth. Add the eggs, one at a time, beating after each one until combined. Add the peppermint extract.

4. Pour the mixture into the prepared pan and bake for 30-35 minutes in a 350° F oven until the cake is set. Remove from oven and cool for 30 minutes.

5. Topping: Re-Heat oven to 475° F.

6. While the filling of the cheesecake is cooling, in a small bowl, combine the sour cream, sugar and extract. Stir until combined.

7. Place the mixture on top of the cooled cheesecake, spreading it out evenly.

8. Place the cheesecake in the 475° F oven for 5 minutes.
9. Remove from the oven and let the cheesecake to cool; once completely cooled, place in the refrigerator for 12 hours to set and chill.

10. Remove the cheesecake one hour before serving to let the cake come to come up to room temperature. Immediately before serving, top the cake with the crushed candy canes. Cut into slices, enjoy!

NOTE ** Cake needs to chill 12 hours **

TIPS & TRICKS

• 1 sleeve of graham crackers yields 1 cup of crumbs.
• Mix the eggs on low speed and scrape the sides of the bowl down after each addition to ensure that all the cheese gets incorporated into the batter.
• Cheese is best served at room temperature, o make sure to remove the cake from the refrigerator an hour before serving so that the flavors are smooth and creamy.
• Top the cheesecake with the peppermint at the last moment because the candies will melt/bleed on to the top. If you’re not enjoying the whole cake at one time, just top each slice before serving.
• You could top the cake with junior mints, York peppermint patties, or shaved chocolate to serve it year round.

DOWNLOAD CANDY CANE CHEESECAKE RECIPE
In December 2019 Holiday Tags Winter, Dessert, Candy Cane, Cheesecake, Peppermint Extract, Fall, cream cheese
Comment

Winter Vegetable Tarte Tatin

November 16, 2018 Nancy Madok
tarte:cover.jpg
tarte:ingrd.jpg

Ingredients

2 large carrots, peeled, sliced into ½” rounds
2 large parsnips, peeled, sliced into ½” rounds
2 medium sweet potatoes, peeled, sliced into ½” rounds
2 medium Yukon gold potatoes, washed, sliced into ½” rounds
1 medium onion, peeled, sliced into half moons.
2T olive oil
1 tsp. salt
4-5 grinds black pepper

½ cup granulated sugar
1T apple cider or red wine vinegar
5 oz. goat cheese, crumbled
2T fresh sage, chopped
2T fresh thyme leaves

1 sheet puff pastry, defrosted
flour for dusting

1. Pre-heat oven to 400° F.

tarte2.jpg

2. Place the carrots, parsnips, and potatoes into a large bowl and toss with olive oil, salt and pepper. Spread the vegetables onto a baking sheet (or two) in a single layer

tarte3.jpg

3. Toss the onion in the bowl with the residual oil and place on the baking sheet.

4. Roast the vegetables for about 25-35 minutes, until slightly soft. Set aside.

tarte5.jpg

5. On your kitchen counter, roll out the puff pastry into a 9” x13” square. Place on a parchment-lined baking sheet and refrigerator until ready to use.

6. Increase the oven temperature to 425° F. Set a 9” x 13” baking pan aside.

tarte7.jpg

7. Place a small saucepan over medium heat; add the sugar, and 2 tablespoons of water. Swirl the pan around until the mixture becomes a light caramel color; about 4-6 minutes.

tarte8.jpg

8. Remove from heat and immediately add the vinegar and a pinch of salt; stir until combined. Carmel will sputter and spatter, so be careful.

tarte9a.jpg

9. Working quickly, pour into the 9” x 13” pan and spread the caramel all over the bottom of the pan.

tarte10.jpg

10. Place the roasted vegetables on top of the caramel in a snug decorative pattern, using smaller pieces to fill up any holes or spaces. You may have extra veggies, save for another use.

tarte11.jpg

11. Sprinkle the onions, goat cheese, sage and 1 tablespoon of the thyme on top of the vegetables.

tarte12.jpg
tarte12a.jpg

12. Remove the chilled dough from the refrigerator, fold the edges under and press the dough down on top of the vegetables. Prick the pastry all over with a fork.

13. Place in 425˚ F oven and bake for 20 minutes, reduce the temperature to 375˚ F and bake an additional 20 minutes until golden brown. Do not open the door while baking.

tarte14.jpg

14. Remove from oven and cool for 10 minutes before carefully inverting the tart onto a serving dish or cutting board.

tarte15.jpg

15. Sprinkle the remaining tablespoon of thyme on top and let the tart sit another 5-10 minutes before cutting into squares and serving.

tarte15a.jpg

TIPS & TRICKS

• You can roast the vegetables a day or two in advance.

• When you pour the caramel into the pan if it doesn’t spread out all the way to the edges, place the pan on the stove over low heat for a few second to remelt the sugar. Be careful the pan get very hot quickly!!

• The tart can be prepared up to step #11 early in the day and left on the counter and then continue the recipe closer to serving.

• The tart is best served warm to room temperature.

• You could use any combination of the vegetables you like and could substitute goat cheese with blue cheese or feta cheese.

Download VEGETABLE TARTE TATIN RECIPE
In Thanksgiving 2018 Class Tags Thanksgiving, Fall, appetizer, Tarte Tartin, Parsnips, Sweet Potatoes, Gold Potatoes, Apple Cider, Red Vinegar, Sage, Puff Pastry
Comment

Candied Glazed Butternut Squash

November 16, 2018 Nancy Madok
squash:cover.jpg

Ingredients

3T butter, room temperature
¾ cup granulated sugar
1tsp. cinnamon
½ tsp. nutmeg
¼ tsp. cloves
1 tsp. salt
black pepper
5 lbs. butternut squash, (8 cups)
½ cup toasted walnuts, rough chopped

1. Preheat oven to 400º F.

squash2.jpg
squash2a.jpg
squash2b.jpg

2. To cut the squash cut it in half, then run the knife down the sides to remove the skin. Scoop out the seeds then cut into 1/2inch cubes.

squash3.jpg
squash3a.jpg

3.In a large bowl, combine the butter, sugar, cinnamon, nutmeg, cloves, salt and 4 -5 grinds of black pepper. Mix until combined into a paste.

squash4.jpg

4. Add the butternut squash and toss until well coated.

squash5.jpg

5. Spread the squash onto a baking sheet in a single layer and roast until caramelized and soft, about 35-45 minutes. Turn once during cooking.

squash6.jpg
squash6a.jpg

6. Transfer the cooked squash and candied glaze on to a platter and top with walnuts. Serve.

• To roast nuts: preheat oven 350º F. Place nuts on a baking sheet and bake for 5 minutes. Shake the pan and continue baking until nuts are toasted, about 3-5 minutes more. Let them cool. The roasted nuts can be store in an airtight container for weeks.

TIPS & TRICKS

• You can cut up the squash 3 days before baking and place in zip lock bag or container. You can purchase precut squash. 2 pounds of precut squash yields about 8 cups. You may need to cut the pieces into small cubes.

• You can prepare the squash in the morning and then reheat it right before serving.

• Pumpkin, acorn squash, carrots and sweet potato are also divine candied.

• Pecans, almonds or hazelnuts work well.

DOWNLOAD CANDIED GLAZED BUTTERNUT SQUASH RECIPE
In Thanksgiving 2018 Class Tags Fall, Thanksgiving, appetizer, Butternut Squash, Cinnamon, Nutmeg, Cloves, Walnuts
Comment

Bourbon Pan Gravy

November 16, 2018 Nancy Madok
gravy:cover.jpg
gravey:ingredjpg.jpg

Ingredients

4T butter
4T flour
3¾ cups stock or pan dripping (skim off fat)
¼ cup bourbon
1T flat leaf parsley, chopped
salt and pepper

gravy1.jpg

1. In a saucepan over low heat, melt the butter; add the flour and stir constantly. Cook until light brown and smells like toast, approximately 2-3 minutes.

gravy1a.jpg
gravy1b.jpg
gravy2.jpg

2. Add pan stock/drippings and bourbon while stirring. Turn the heat to medium high and cook until slightly thick, approximately another 4-6 minutes.

gravy3.jpg

3. Season with salt and pepper to taste and add parsley.

TIPS & TRICKS

• This gravy is meant to be on the thin side, the idea is that it will be poured over the turkey and stuffing to warm them up.

• If you prefer a thicker gravy increase the butter and flour by 1 tablespoon each.

DOWNLOAD BOURBON PAN GRAVY RECIPE
In Thanksgiving 2018 Class Tags Gravy, Thanksgiving, Fall, appetizer, Bourbon
Comment

Apple, Walnut, & Sausage Stuffing

November 16, 2018 Nancy Madok
stuffing:cover.jpg
stuffing:ingrd.jpg

Ingredients

2 baguettes, cut into ½” cubes (10-12 cups)
1-pound sausage
4T olive oil
2 large onions, peeled and medium dice
3 cloves garlic, crushed
1½ cups celery, medium dice (6 large stalks)
1 ½ cups apple, medium dice (1 large apple)
2 cup (8 oz.) mushrooms, washed and sliced
1½-cup chicken stock
½ cup white wine
3T fresh sage, chopped
1 T fresh thyme leaves
1cup toasted walnuts* rough chop
2 eggs, beaten
salt & pepper

1. Put the bread cubes on a baking sheet and let them dry completely; dry overnight or place in a 350° F oven for 10 minutes.

stuffing2.jpg

2. In a large size sauté pan over medium heat, heat 2T of the olive oil; add the sausage. Using a spoon, break it into pieces and cook until brown. Remove the sausage from the pan with a slotted spoon and place into a large bowl.

stuffing3.jpg
stuffing3a.jpg

3. If needed, add the remaining 2T olive oil to the pan (you may have enough oil left from cooking the sausage); and sauté the onions for 2–3 minutes, then add the garlic cook and another minute. Add the celery, apple and mushrooms. Continue cooking until slightly softened, about 5-8 minutes.

stuffing4jpg.jpg
stuffing4a.jpg

4. To the large bowl with the sausage, add the bread cubes, sautéed vegetables, chicken stock, wine, sage, thyme, and walnuts. Mix until well combined. Taste and season with salt & pepper, then add the eggs and fold them into the stuffing. The stuffing mixture should look moist, but not have puddles of liquid. If too dry, add a little more wine or stock.

5. Stuffing can be used to stuff turkey or place in a baking dish, cover with foil and bake in a 350° F oven until hot, about 20 minutes. Remove the foil and bake for additional 5-10 minutes to brown and crisp up stuffing.

*To roast nuts: preheat oven 350º F. Place nuts on a baking sheet and bake for 5 minutes. Shake the pan and continue baking until nuts are toasted, about 3-5 minutes more. Let them cool. The roasted nuts can be store in an airtight container for weeks.

TIPS & TRICKS

• You can cube and dry out your bread ahead of time. Store in an air tight containers. It can also be frozen.

• If the sausage is in a casing, remove it. I like to use Italian sweet pork, but you could also use chicken or turkey sausage.

• You can also do step #1 to #3 ahead of time or can be frozen.

DOWNLOAD APPLE WALNUT SAUSAGE STUFFING RECIPE
In Thanksgiving 2018 Class Tags Fall, Thanksgiving, Stuffing, Apple, Walnut, appetizer
Comment

Perfectly Roasted Turkey

November 16, 2018 Nancy Madok
turkey :cover.jpg
turkey:ingred.jpg

Ingredients

1 14-16 pound turkey
1T dried sage
3 tsp. salt
1 tsp. black pepper
3 slices bacon, cut in half
fresh thyme & sage leaves
olive oil
3 cups chicken stock

turkey1:2.jpg

1. Wash the turkey inside and out, removing the little bag of goodies.

2. Pat the turkey dry.

turkey3.jpg

3. In a small bowl, combine the dry sage, salt and pepper

turkey4.jpg

4. Using your fingers, separate the skin from the breast meat. Sprinkle with spice blend. Place 3 half slices of bacon, thyme, and sage leaves under the skin of each breast.

turkey5.jpg
turkey5a.jpg

5. Rub the bird with olive oil, then rub with spice `mixture.

6. Let stand on the counter for 1 hour.

7. Preheat oven to 425° F.

turkey8.jpg

8. Loosely stuff the cavity of the turkey with stuffing, not too stuffed.

turkey9jpg.jpg

9. Place the stuffed turkey on the rack in a roasting pan, and then pour the stock into the pan.

turkey10.jpg

10. Place uncovered turkey in a preheated 425º F oven for 30 minutes. After 30 minutes, cover the roasting pan with foil. Using potholders, crimp and press the foil into the edges of the pan making a tight seal and return to oven and reduce the heat to 350º F and continue roasting for 3-3½ more hours.

turkey11.jpg

11. Check the internal temperature; it should be 160-165º F deep in breast. If it is not 165º F, recover with the foil and continue cooking, checking every 30 minutes until the internal temperature reaches 160-165º F.

12. Remove foil; baste with pan drippings, if necessary place back in oven and brown an additional 5-10 minutes. Remove from the oven.

13. Rest the turkey at least 30 minutes before carving. The turkey will remain warm for about 1½ hours

turkey14.jpg
turkey14a.jpg

14. To carve the turkey, remove the stuffing, then use a carving knife; remove the leg and thigh. Then separate the leg from the thigh. Remove the meat from the bones and slice into bite-size chunks and place on platter. Repeat with other leg.

turkey14b.jpg
turkey14c.jpg
turkey15.jpg
turkey15a.jpg
turkey15b.jpg

15. Cut down the breastbone to remove the breast meat from the bone. Remove the bacon and herbs from under the skin. Slice into slices of the desired thickness and place on platter. Repeat with other side. Enjoy!

turkey15c.jpg

TIPS & TRICKS

• I wash the turkey (step #2) the night before then place in a clean garbage bag.

• On Thanksgiving Day, 6 hours before serving, I take the turkey out of the refrigerator and start the recipe from step #3. This allows the turkey to sit an hour on the counter. Then 4 hours to roast and an additional hour in case it needs longer roasting time and time to rest before carving.

• The cooked turkey can sit up 1½ hour before carving. The meat will still be warm. Serve with plenty of hot gravy.

DOWNLOAD ROASTED TURKEY RECIPE
In Thanksgiving 2018 Class Tags Main, Thanksgiving, Turkey, Fall, Bacon, Sage
Comment

Pumpkin Spice Crème Brûlée

November 16, 2018 Nancy Madok
brulee:cover.jpg
brulee:ingrd.jpg

Ingredients

3 cups heavy whipping cream
½ cup granulated sugar
5 egg yolks
1 can (15oz. pure pumpkin)
1T vanilla bean paste or vanilla extract
1 tsp. cinnamon
½ tsp. nutmeg
½ tsp. ginger
½ cup granulated sugar (for topping)

1. Pre-heat the oven to 325° F. Place oven rack in center of the oven.

brulee2.jpg

2. Place ten ¾ cup ramekins in a large ceramic or metal roasting pan. (you may need 2 pans)

brulee3.jpg

3. In a medium saucepan over medium heat, add the cream, and sugar. Let the sugar dissolve; heat the mixture until its come to a simmer.

4. Bring a teakettle or a saucepan full of water to a boil and set aside.

brulee5.jpg
brulee5a.jpg

5. In a medium bowl, whisk the egg yolks, pumpkin, vanilla and spices until blended. Slowly add the hot cream mixture and whisk until well blended.

brulee6.jpg

6. Pour the mixture into each ramekin to about ¾ full. Place the roasting pan holding the ramekins onto the oven rack, and then fill the pan with enough hot water to come halfway up the sides of the ramekins, being careful not to get any water into the custard. Bake the custard until the center is almost set, about 30-35 minutes.

brulee7.jpg

7. Remove ramekins from the pan, place on a cooling tray, and cool for 30 minutes. Place into refrigerator and chill at least 4 hours.

brulee8.jpg
brulee8a.jpg

8. When ready to serve, sprinkle 1-2 teaspoon of sugar onto the top of the custard in each ramekin. Using a blowtorch or the broiler, melt the sugar until bubbly and light brown, but be careful not to burn the sugar. Serve!

brulee8b.jpg

TIPS & TRICKS

• Pour the pumpkin mixture back into the measuring cup for easy filling of the ramekins.

• If you use ½ cup ramekins and the recipe yield 12 serving.

• You can make the custard 3 days is advance.

• Freeze the egg whites for another use.

• Place the pan with the filled ramekins in the over before filling the pan with hot water.

• Use a kitchen towel to careful grab the cooked custard and remove them from the water.

Download Pumpkin Creme Brulee Recipe
In Thanksgiving 2018 Class Tags Dessert, Fall, Thanksgiving, Whipping Cream, Cinnamon, Nutmeg, Ginger, Brulee
Comment

White Bean & Roasted Garlic Dip

October 30, 2018 Nancy Madok
bean:cover.jpg
bean:ingrd.jpg

Ingredients

1 large head garlic
1T olive oil

4 cup cannellini or small white bean or 2 14 oz. cans of beans, drained
1T lemon zest
2T lemon juice
2T water
Salt & pepper

2T olive oil
¼ cup sundried tomatoes, oil packed, drained, and chopped
¼ cup hazelnuts, toasted and chopped
3T parsley, chopped finely

Crostini:

1 baguette loaf, cut on diagonal into 20 thin slices
¼ cup olive oil

1. Preheat oven to 350º F.

2. Line a small baking sheet or pan with parchment paper. Cut off the top of the garlic head and place on baking sheet. Drizzle olive oil on top. Place in oven and bake until soft to the touch, about 45-50 minutes. Let cool.

bean3.jpg

3. Once the garlic is cool, squeeze all the cloves out into a food processor. Pulse a few times.

4. Add the beans, lemon zest, juice, and water. Blend until smooth and creamy. If the mixture is too thick, add another tablespoon or two of water. Season with salt and pepper.

5. Pour the bean dip into a shallow bowl. Drizzle a little olive oil on top. Sprinkle the sundried tomatoes, hazelnuts, and parsley on top.

6. Serve with crudité, pita chips, or crostini

Beans:

1. Rinse the beans to remove foreign particles. Place in a bowl and cover with cold water; soak the beans overnight. Drain beans.
2. In a large pan with a lid, add the soaked and drained beans. Cover with water.
3. Bring beans to a boil, then lower heat to a simmer place. Cover ¾ of the pot and simmer until beans are tender, about 40-60 minutes. Add more water if necessary. Season with salt and pepper. Set beans and cooking liquid aside until needed. Makes 8 Cups.

Roasted Nuts:

1. Preheat oven 350º F. Place nuts on a baking sheet and bake for 5 minutes. Shake the pan and continue baking until nuts are toasted, about 3-5 more minutes. Set aside.

Crostini:

1. Preheat the oven to 400º F.
2. Place the sliced bread onto a baking sheet. Brush each slice with a little olive oil. Bake until golden brown, about 8-10 minutes. Set aside.

TIPS & TRICKS

• Just don’t roast 1 head of garlic, but instead several. It is great smeared on a crostini with a glass of wine as an appetizer, or add to your favorite sauce or soup.

• You can also top the dip with chopped olives or different types of nuts like almonds and pecans.

• Can be made 3 days in advance. Just cover securely with plastic wrap.

In October 2018 Class Tags White Bean, Cannellini bean, Lemo, appetizer, starter, fall, Crostini, Hazelnuts, Fall
Comment

Date Rumaki

October 30, 2018 Nancy Madok
rumaki:cover.jpg

Ingredients

1-pound dates (about 24)
6 oz. goat cheese, room temperature
½ cup roasted almonds
1-pound (12 slices) prosciutto

1. Preheat the oven to 400º F. Line a baking sheet with aluminum foil and place a cooling rack on top of the baking pan.

2. Place the dates on a cutting board. Using a paring knife, make a slit on the side of each date and remove the pit.

3. Using a spoon or your fingers, stuff about a teaspoon of goat cheese into the date. Top the cheese with an almond or two. Pinch the date closed.

4. Place a piece of the prosciutto on the cutting board and cut it in half, lengthwise (only cut 1 piece at a time, so it doesn’t dry out). Wrap the date in a ½ piece of the prosciutto and secure it with a toothpick.

5. Place on the rack of the baking sheet. Repeat with the remaining dates. Leave a little space between each date as you place them on the baking sheet.

6. Place the baking sheet in the oven and bake for 6-7 minutes. Remove from the oven and flip over. Bake for an additional 6-7 minutes until crispy and brown.

7. Let cool slightly. Place on serving platter. Serve warm.

TIPS & TRICKS

• I like to use Medjool dates. They are a nice big size and have a soft, chewy texture and are so sweet!

• You can substitute the goat cheese with blue cheese and use toasted pecans or walnuts instead of almonds.

• The dates can be stuffed 2 days in advance. Just cover them well with plastic film so they don’t dry out.

In October 2018 Class Tags appetizer, starter, Fall, Goat Cheese, dates, Almonds, prosciutto
Comment

Pomegranate Champagne Punch

October 30, 2018 Nancy Madok
punch:cover.jpg

Ingredients

1 orange, skin on, thinly sliced into half moons
¼ cup mint leaves
¼ cup pomegranate seeds
¼ cup Cointreau or orange liquor
2 cups cold ginger ale
1-cup cold unsweetened pomegranate juice
1 bottle champagne or sparking wine

punch1c.jpg

1. To remove the seeds from the pomegranate, score/cut around the middle of the pomegranate, cutting though the skin but not cutting it half. Tear it open and gently “crack” the halves. Place a half of pomegranate in your hand upside down over a bowl and gentle bang on it with a wooden spoon until all the seeds fall out.

2. Fill a small bowl, mold, or cake pan with the sliced oranges, mint leaves and pomegranates seeds. Fill with 4 cups of water. Place in freezer until frozen.

punch3.jpg

3. In a punch bowl, add the frozen fruit ring.

punch4.jpg

4. Add the Cointreau, ginger ale, pomegranate juice, and champagne or sparkling wine. Stir.

5. Pour into glasses and serve immediately,

TIPS & TRICKS

• Place the mold in the freezer then fill it with water.

• Ice ring will keep punch cold for several hours. Double the liquid to serve more people.

In October 2018 Class Tags appetizer, starter, Fall, Mint Leaves, {p, Pomegranate, Cointreau, Champagne
Comment

Frico (Cheese Crisps)

September 30, 2018 Nancy Madok
frico:cover.jpg

Ingredients

1 cup finely shredded or grated Parmigiano cheese

1. Preheat oven to 375º F.

2. Line 2 baking pans with parchment paper.

3. To grate cheese: Allow the cheese to set on your counter for 30 minutes to slightly soften. Remover the rind and set aside. Cut the cheese into medium dice.

4. Working in batches, grind the cheese in your blender or food processor until it’s a fine grind.

5. Sprinkle 2 tablespoons of the mixture on a pan to form a 4-inch circle. Leave room between each cheese circle. Repeat with the rest of the mixture, forming approximately four 4-inch circles on each baking pan.

6. Bake one sheet at a time for 6-8 minutes, just until lightly brown.

7. Let the fricos sit on the tray for a minute, then carefully remove from pan and place on cooling rack to completely cool and crisp up. You can also drape the fricos over a rolling pin to give them a curved shape. Repeat with remaining tray.

8. Best served the day they are baked, as a side with the gazpacho or as an appetizer.

TIPS & TRICKS

• Since this dish only has 1 ingredients use the best cheese you can.

• Be careful when grinding the cheese in the blender or food processor, work in small batches so you don’t over work the machine making the motor get warm and then melting the cheese. Traditional the cheese is grated by hand at the time it used, I know this is cheating but if done in small batched the results is still good. Extra grated cheese can be stored in an airtight container.

• These make an absolutely easy, decanted appetizer

In September 2018 Class Tags appetizer, starter, Parmigiano, Cheese Crisp, Fall, Easy
Comment

End of the Season Tomato Gazpacho

September 30, 2018 Nancy Madok
gazp.cover.jpg

Ingredients

4 cloves garlic, smashed

4 peppers (red, yellow, or orange) diced into large pieces

3 pounds very ripe tomatoes, diced into large pieces

1 cup day old baguette, diced into medium pieces

½ cup olive oil

¼ cup sherry or champagne vinegar

1 cup cucumber, small dice

½ cup scallions, small dice (white & light green parts)

Salt & pepper

gazp.1b.jpg

1. Lay your bell peeper on its side on a cutting board. With your chef’s knife, cut one side of the pepper off to make a flat side. Place the flat side down on the cutting board. Now cut another side off and place it on the board. Cut the remaining sides off. Discard the seeds. Cut the pepper into pieces.

gazp.1c.jpg

2. Cut the tomatoes into large pieces.

3. Using a Vitamix blender or food processor, working in batches, blend the garlic, peppers, tomatoes, bread, olive oil, and vinegar until it becomes a smooth purée.

4. Pass the soup through a medium-hole strainer or sieve. The soup should have the consistency of a thin milk shake. If needed, add ½-1 cup water to reach desired consistency. If you prefer a thicker soup, then add less water or none at all.

5. Season with salt and pepper to taste. Cover and chill for at least two to three hours.

6. Ladle the gazpacho into bowls or cute jars. Top with diced cucumber and scallions and serve.

TIPS & TRICKS

• Gazpacho can be made 2-3 days in advance

• I prefer to use tomatoes from the garden or the farmers markets in the summertime since they are at their peek flavor. Any variety will do- red, yellow, heirloom, or beefsteak just to name a few--as long as they are nice and ripe. They can be “ugly.” Just cut off any blemishes and blend them up!

• If you can’t find sherry vinegar, you can use champagne or even balsamic vinegar. They have a nice acidity to them but are not as strong in flavor as red wine vinegar.

• You can garnish the soup with finely diced jalapeños or bacon for an extra pop!

• Gazpacho makes a great appetizer or first course severed in the cute jars or little glasses.

In September 2018 Class Tags appetizer, Gazpacho, Bell Peppers, cucumber, Fall
Comment

Peach Clafouti

September 30, 2018 Nancy Madok
peach:cover.jpg

Ingredients

1 tsp. butter room temperature

3-4 yellow or white peaches

3 large eggs

1/3 cup sugar

1/3 cup flour

1 tsp vanilla extract or paste

2T Amaretto Liqueur

¼ cup heavy or whipping cream

½ cup milk

2T butter, melted

½ cup sliced almonds

Confectioner’s sugar

1. Heat oven to 350º F.

2. Using a paper towel, smear the butter all over the inside of a 4-6 cup baking dish.

3. Place enough water to cover the peaches in a saucepan. Then set on high heat until it comes to a boil. Turn off the heat.

peach4.jpg

4. Place the peaches in the water for 2-3 minutes; remove from the water with a slotted spoon and place in a bowl of ice. Toss the peaches around until slightly cooled.

5. Using a paring knife, peel the peaches. Remove the pit and cut into medium dice pieces so that you have about 4 cups of fruit. Place in the buttered dish.

6. In a large bowl, whisk the eggs and sugar until lightly frothy and the sugar is dissolved.

7. Add the flour, vanilla, and Amaretto. Whisk until smooth.

8. Whisk in the milk, heavy cream, and melted butter.

9. Pour the batter on top of the fruit.

10. Sprinkle the almonds on top.

11. Bake until puffed and brown and skewer comes out clean, about 40 minutes.

12. Dust with confectioner’s sugar. Serve warm.

TIPS & TRICKS

• Depending on the size of your peaches, you might only need 3; but I always buy an extra one in case one is mealy or there is a surprise inside. Yellow peaches have the classic peach, slightly acidy tart taste, while the white ones are very floral and sweet. Both are delicious!

• As the seasons change you can use pears, berries, nectarines, plums, or cherries which are the classic fruit used in the clafouti.  I invite you to try them all.

• Use can also change up the liqueur to match the fruits. A little brandy pairs perfectly with the pears or plums, while Cointreau or Grand Marnier works lovely with the nectarines and berries.

• If you don’t have heavy cream, you can use ¾ cup of milk. I use whole milk.

In September 2018 Class Tags Dessert, Clafouti, Peaches, A, amaretto, Almonds, Whipping Cream, Fall
Comment

Pasta with Ragu Bolognese

September 7, 2016 Nancy Madok
bolognese-recipe shot.jpg
bolognese- ingred.jpg

Ingredients

2T olive oil
5 oz. pancetta (uncured bacon)
1 medium onion, finely diced
½ cup carrot, finely diced
½ cup celery, finely diced
1-pound ground beef
½ cup red wine
2T double-concentrated tomato paste dissolved in 1-cup warm water
1-cup whole milk
Salt & pepper
1-pound fresh pasta (tagliatelle, fettuccine, pappardelle, or penne)
½ cup Parmigiano Reggiano cheese, and some extra cheese for table

bolognese#1.jpg

1.    In a food processor, or by hand, finely chop the pancetta until it resembles ground pork.

bolognese#2jpg.jpg

2.    In a medium saucepot or Dutch oven over medium heat, add the olive oil. When warm add the pancetta, cook about 4 minutes until some of the fat starts to render out.  

bolognese#3.jpg

3.    Add the onion, carrots, and celery and cook until vegetables are soft, about 4-6 minutes. 

bolognese#4.jpg

4.    Increase the heat to medium-high and add the ground beef. Using a spoon, break the meat up into small pieces. Continue stirring and continue breaking the meat into very small pieces until the meat has cooked evenly.

bolognese#5.jpg

5.    Stir in the red wine and cook about 2 minutes. Add the diluted tomato paste and reduce the heat to a simmer.

bolognese#6.jpg

6.    Every few minutes, give the sauce a stir and add a tablespoon of the milk until it is all gone. Cook the sauce for 1½ to 2 hours until most of the liquid has evaporated. If the sauce should become too dry during the cooking time, carefully add 1-2 tablespoons of water. Season with salt and pepper. Set the sauce aside until ready to use. Reheat if necessary.

7.    When ready to serve, bring a large pot of water to a boil. Add 1 tablespoon of salt. Add the pasta and cook the pasta for 2-4 minutes.

8.    Drain the pasta. Place in a large bowl or platter and reserve ½ cup of the pasta cooking liquid.

9.    Toss the pasta with the sauce. If it seems a little dry, add a little of the pasta cooking liquid. Add the cheese and toss again.

10.    Serve with more cheese on the side.

bolognese#7.jpg

TIPS & TRICKS

•    There are so many recipes for ragu Bolognese. I adapted this version from the Accademia Italiana Della Cucina recipe, which is the standard recipe most Bolognese’s follow.
•    Sauce can be made 3-4 days in advance and freezes nicely.
•    If possible, always serve with fresh, long stranded pasta so that the sauce clings to the noodles.

Featured
bolognese-recipe shot.jpg
Pasta with Ragu Bolognese
fish-cover recipe.jpg
Baked Fish with Olives, Tomatoes, & Herbs
sbisolona-covershot.jpg
Torta Sbisolona
In Sept 2016 Bologna Italy Tags Pasta, Ragu, Bolognese, Fall
Comment

Baked Fish with Olives, Tomatoes, & Herbs

September 6, 2016 Nancy Madok
fish-cover recipe.jpg

Ingredients

3T olive oil
1 medium onion, medium dice
4 cloves of garlic, crushed
1 28 oz. can of whole tomatoes and juice
5 sprigs fresh thyme
3-4 basil leaves (extra leaves for decoration)
½ cup Kalamata Olives, pitted
2T capers
Salt and pepper

8 8 oz. skinless firm white fish filets (mahi-mahi, halibut, cod, or grouper)

1.    Preheat oven to 425º F.

fish#1.jpg

1b.  In a medium sauté pan over medium heat, add the olive oil; when warmed, add the onions sauté 3-4 minutes.  Add the garlic and continue cooking until the onions are soft, about 2-3 minutes more.  

2.    Add the tomatoes, and, using a wooden spoon, break the tomatoes into small pieces.  

3.    Add the thyme and basil leaves.  Bring the sauce to a simmer, stirring occasionally for 25 minutes, until sauce thickens.  

fish#3.jpg

4.    Remove from heat stir in the olives and capers; adjust seasoning with salt and pepper.  Pour the sauce into a 9”x13” roasting pan. (if you make the sauce ahead reheat it, so that is hot)

5.    Season the fish filets on both side with salt and pepper.

fish#5.jpg

5b.  Place on top of the sauce.

6.    Place the fish into the 425º F oven and cook 10-15 minutes.  Check for doneness by inserting a knife into a thick part of the fish; it should be slightly firm and opaque.  Remove fish from oven and let sit 2 minutes, it will continue to cook out of the oven, so be careful not to overcook. 

7.    Place the fish filets on platter or plates, remove the thyme sprigs and

8.    Garnish with a few fresh basil leaves.  Serve immediately.  

fish#7:6.jpg

TIPS & TRICKS

•    I like to use San Marzano Tomatoes, I think they have the best flavor of all the canned tomatoes.
•    Try to buy olives with their pits. This way the olive flesh is firm and not soggy from sitting in the brine. Use the side of your French knife and lightly press the olive until the pit pops out.
•    Use whatever fish is the freshest. Most firm white fish are delicious in this recipe. I have also used frozen wild caught cod and halibut with great success. 

Featured
bolognese-recipe shot.jpg
Pasta with Ragu Bolognese
fish-cover recipe.jpg
Baked Fish with Olives, Tomatoes, & Herbs
sbisolona-covershot.jpg
Torta Sbisolona
In Sept 2016 Bologna Italy Tags Fish, Olives, Tomatoes, Baked, Fall
Comment

Torta Sbisolona

September 5, 2016 Nancy Madok
sbisolona-covershot.jpg
sbislona#ingred.jpg

Ingredients

1½ cups whole raw almonds plus 12 almonds for decoration
1½ cups all-purpose flour
1 cup finely ground corn meal
1 cup granulated sugar
2 sticks of butter
2 eggs yolks
zest of 1 lemon
1 tsp. vanilla

1.    Preheat oven to 350º F.

2.    In a food processor, place the almonds, and process until the almonds resembles coarse sand.  Place in a large bowl. 

3.    Add the flour, corn meal and sugar.  Mix together.  Add the butter, and, working with your hands break, the butter up into little pieces.  Mix with the dry ingredients until it starts to look like wet sand.  The mixture should be loose and not a cohesive mass.

sbisolona#4.jpg

4.    Add the egg yolks, lemon zest, and vanilla. Mix just until ingredients are incorporated.  

sbisolona#4A.jpg

4b.  The dough should be loose and crumbly.

5.    Let the dough crumble and fall out of your hands like it is raining dough into a 11-inch, removable-bottom tart pan.  Do not press the dough down into the pan; this is imperative to keep the crumbly texture.

sbisolona#5A.jpg

5b.  Decorate the top of the torte with the 12 almonds.

6.    Bake at 350º F oven for 35-40 minutes, until golden brown.  Remove the torte from the oven and cool completely in the pan.

7.    To serve, remove the torte from the tart pan and place on a platter.  The torte should not be cut rather broken into piece with your hands.  Enjoy! 

TIPS & TRICKS

•    This torta makes a wonderful dessert or van equally be enjoyed for breakfast.
•    Can be made a week in advance. Store it in a large zip lock bag.

Featured
bolognese-recipe shot.jpg
Pasta with Ragu Bolognese
fish-cover recipe.jpg
Baked Fish with Olives, Tomatoes, & Herbs
sbisolona-covershot.jpg
Torta Sbisolona
In Sept 2016 Bologna Italy Tags Dessert, Torta, Sbisolona, Fall
Comment

Caesar Salad

September 4, 2016 Nancy Madok
caesarcover.jpg
caesaringred..jpg

Ingredients

Croutons
½ fresh baguette, cut into ¾ -1 inch cubes (3 cups)
6T olive oil
2 cloves garlic, crushed

Dressing
4-6 oil-packed anchovies
4 cloves garlic, crushed
1 egg yolk
1 tsp. lemon zest
3T lemon juice
2 tsp. Dijon mustard
½ tsp. Worcestershire sauce
¼ tsp. salt
¼ tsp. pepper
½ cup extra virgin olive oil
¼ cup Parmigiano-Reggiano, grated

Salad
2 large heads Romaine lettuce
½ cup Parmigiano-Reggiano, grated

1.    Pre-heat oven to 350°F.

caesarcroutons2.jpg

2.    Place the bread cubes into a large bowl.  In a small bowl, mix together the olive oil and garlic until combined.  Add the garlic oil mixture to the bread cubes and toss until coated.

caesarcroutons3.jpg

3.    Spread the cubes onto a baking sheet in a single layer. Bake until the bread cubes are golden brown, about 15-17 minutes. 

caesardressing1.jpg

Dressing:
1.    In a blender, add the anchovies, garlic, egg yolk, lemon zest, juice, mustard, Worcestershire sauce, salt and pepper.  Pulse a few times until all ingredients are combined.

caesardressing2.jpg

2.    With the blender running on “low” speed, slowly add the olive oil in a steady stream.

3.    Stop the blender and stir in the cheese.

caesarsalad1.jpg

1.    Wash the heads of Romaine lettuce.  Cut off the stems, and then cut the head into quarters.  Lay on a platter or salad plate.  Drizzle the salad dressing over each spear.

2.    Sprinkle the cheese, top with croutons and serve immediately.

TIPS & TRICKS

•    Croutons can be made and kept in airtight container for a week.
•    Dressing can be made 3 days in advance. It also made a great dip for crudités veggies and stemmed artichokes. 

Featured
caesarcover.jpg
Caesar Salad
pizza sauce3.jpg
Perfect Pizzas - Part 1 - Sauce
Pizza clas cover shot.jpg
Perfect Pizzas - Part 2 - Dough
tiramisu:covershot.jpg
Tiramisu
In Sept 2016 Pizza Class Tags Salad, Appetizer, Caesar Salad, Crutons, Fall
Comment

Perfect Pizzas - Part 1 - Sauce

September 3, 2016 Nancy Madok
pizza sauce3.jpg
pizza sauce ingred.jpg

Ingredients

2T olive oil
2 cloves garlic, crushed
1 28 oz. can whole tomatoes
3-4 basil leaves salt & pepper

pizza sauce1.jpg

1.    Place a small sauté pan over medium-low heat, add the oil and heat until slightly warm.  Add the garlic and cook 1-2 minutes, until soft and being careful not to burn the garlic

pizza sauce2.jpg

2.    Add the tomatoes; using a wooden spoon, break the tomatoes into small pieces.  Raise the heat to medium- high.  

pizza sauce3.jpg

3.    Add the basil and cook until the sauce thickens slightly, about 5-7 minutes. Season with salt and pepper. Sauce can be used chunky or pureed.

pizza cover.jpg

Continue to Part 2 of Recipe

Part 2 - Pizza Dough and Toppings
Featured
caesarcover.jpg
Caesar Salad
pizza sauce3.jpg
Perfect Pizzas - Part 1 - Sauce
Pizza clas cover shot.jpg
Perfect Pizzas - Part 2 - Dough
tiramisu:covershot.jpg
Tiramisu
In Sept 2016 Pizza Class Tags Pizza, Main, Sauce, tomato, Fall
Comment

Perfect Pizzas - Part 2 - Dough

September 2, 2016 Nancy Madok
Pizza clas cover shot.jpg
pizza ingred.jpg

Ingredients

1 package active yeast
1½ cups water  
4 cups all-purpose flour
1½ tsp salt
2T olive oil

Toppings:
2-3 cups assorted toppings: sliced pepperoni, mushrooms, sun-dried tomatoes, olives; goat cheese, fresh mozzarella, basil leaves. pizza sauce ( see below)
¼ cup corn meal

1.    Preheat oven to 500°F.  Place pizza stone on the middle rack inside the oven.

pizza2.jpg

2.    Heat the water to 110° F water

pizza2A.jpg

2b.  dissolve the yeast and set aside.

3.    Place the flour and salt in the bowl of a food processor and pulse a few times to mix together.

pizza4.jpg

4.    With the food processor running, add the water-yeast mixture in a steady stream.  

pizza5.jpg

5.    Turn off the machine and add the oil.  Pulse a few times to mix in the oil.

pizza6.jpg

6.    Scrape the dough out of the bowl onto a floured board.  

pizza7.jpg

7.    Gather any bits of dough and flour and quickly knead into a large ball.

pizza8.jpg

8.    Cut the dough into 4 equally sized pieces.

pizza9jpg.jpg

9.     Roll each piece into a tight, smooth ball, cover with a clean dishtowel and set aside to rise until double in size, about 45 minutes.

pizza10A.jpg

10.    Place a ball of dough on a lightly-floured board and, using your fingertips, press it into a flat cake about ½ inch thick. 

pizza10B.jpg

10b.   Lift the dough and, using your hands, gently stretch and rotate the dough in a circular motion until the dough is about ¼ inch thick

pizza11.jpg

11.    Sprinkle corn meal onto the peel. 

pizza11A.jpg

11b.  Lay the shaped pizza dough onto the peel.

pizza12jpg.jpg

12.    Top with sauce and toppings.

13.    Carefully slide the pizza off of the peel and onto the pizza stone in the oven.  Bake until the edges are crispy and underside is brown, about 6-7 minutes.

14.    Remove the pizza with the peel or spatula, place onto a cutting board and let sit 2-3 minutes before cutting.  Repeat with remaining dough.

pizza cover.jpg
PART 1 - PERFECT PIZZAS SAUCE

TIPS & TRICKS

•    You can make the pizza dough and refrigerate it up to a day in advance. Just cover the towel tray with plastic wrap. When ready to use remove the tray from the refrigerator and allow to rise about 45-50 minutes.
•    Pizza sauce can be made in advance. It will last 3-4 days in refrigerator. It can also be frozen.
•    Make sure the sauce is cool before you top the dough with it. Otherwise the dough will stick to the peel.

Featured
caesarcover.jpg
Caesar Salad
pizza sauce3.jpg
Perfect Pizzas - Part 1 - Sauce
Pizza clas cover shot.jpg
Perfect Pizzas - Part 2 - Dough
tiramisu:covershot.jpg
Tiramisu
In Sept 2016 Pizza Class Tags Main, Pizza, Fall
Comment
Older Posts →

PRIVACY POLICY 2020

COPYRIGHT 2020 Cucina Casa M