• UnderConstruction
  • Home
  • Seasons
  • Classes
  • Tours
  • About
  • CONTACT
  • Menus
Menu

Cucina Casa M

Street Address
City, State, Zip
Phone Number

Your Custom Text Here

Cucina Casa M

  • UnderConstruction
  • Home
  • Seasons
  • Classes
  • Tours
  • About
  • CONTACT
  • Menus

Goat Cheese Truffles

November 26, 2019 Nancy Madok
goatcheese:cover.jpg
goatcheese:ingred.jpg

Ingredients

16 oz. goat cheese
¼ cup Greek yogurt
1tsp. herbs de Provence

Roll:
½ cup finely chopped nuts, walnuts, pecans, pistachios or almonds
2T chopped parsley
½ cup dried cranberries finely chopped
½ cup spices: sesame seeds, everything bagel, or poppy seeds

Crostini:
1 baguette loaf, cut on diagonal into 24 thin slices
¼ cup olive oil

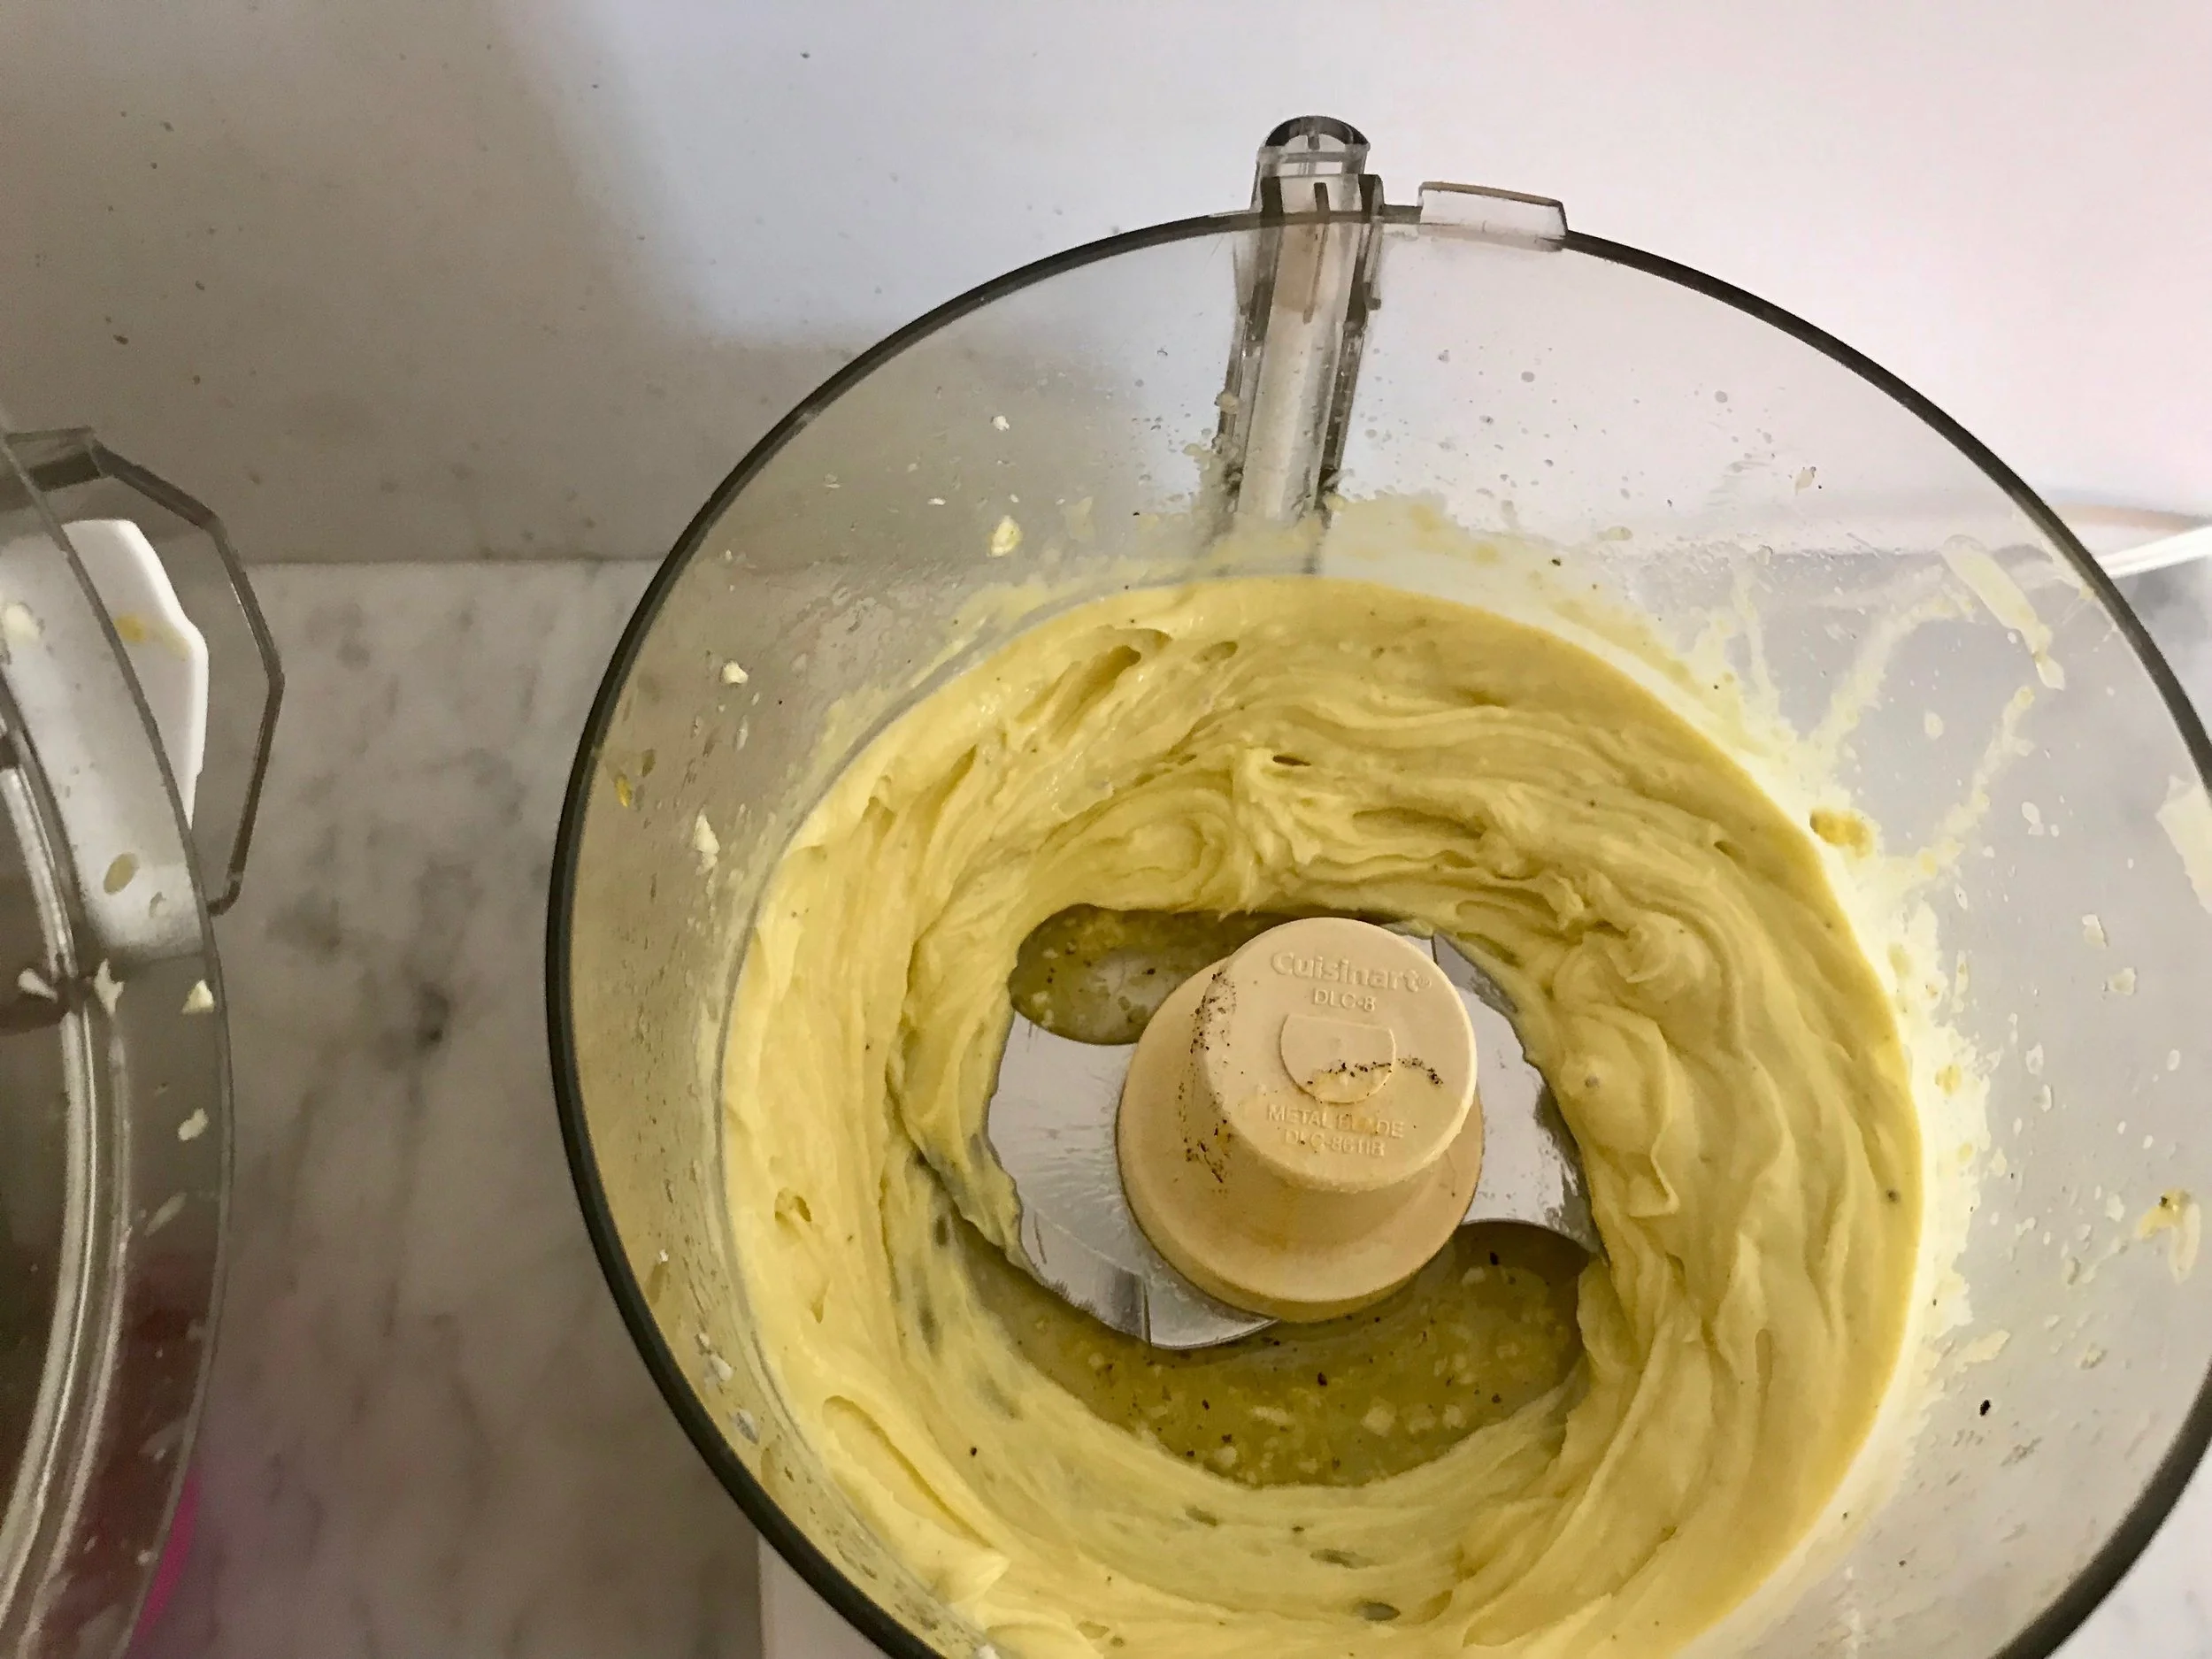
1. In a bowl of your food processor, pulse the goat cheese, yogurt, and herbs de Provence until well blended.

2. Damped your hand with water and place a teaspoon of the cheese mixture into the palm of your hand; roll into a small ball. Place on a parchment-lined baking sheet. Repeat until all the cheese is rolled into balls.

3. Cover the tray with plastic wrap and refrigerate until firm, about 2 hours or over night. Once the cheese balls have firmed up, remove them from the refrigerator and roll into the nuts, fruits and seeds, coating the outside of the balls completely.

4. Place on serving tray with crostini. Cheese Truffles are best when served room temperature.

Crostini

1. Preheat the oven to 400º F. Place the sliced bread onto a baking sheet. Brush each slice with a little olive oil. Bake until golden brown, about 8-10 minutes.

TIPS & TRICKS

• If the cheese gets too soft while rolling into balls, place the mixture in the refrigerator to firm up a bit.
• Goat cheese balls can be rolled 2 days in advance. Then, the morning of your event, roll the balls in the different coatings.
• Cheese is best served at room temperature, so remove the truffles from the refrigerator 30 minutes before serving them.
• I placed the balls in little paper cups to make them look more like truffles.

DOWNLOAD GOAT CHEESE TRUFFLES RECIPE
In Nov 2019 Appetizer Class Tags Goat Cheese, Winter, Holidays, Holiday, appetizer, starter, Greek Yogurt, Herbs de Provence, Pecans, pistachios, cranberries, sesame seeds, crostini
Comment

Chocolate Pearl Cookies

November 25, 2019 Nancy Madok
Cookie.jpg
Cookieingred.jpg

Ingredients

1½-cup walnuts
½ cup unsweetened cocoa powder
2 cups all-purpose flour
¼ tsp. baking soda
1 tsp. baking powder
½ tsp. salt

¾ cup/6oz. butter, room temperature
¾ cup golden brown sugar
¼ cup milk
1tsp vanilla
1 egg

1 cup pearl sugar or confectioners sugar

1. Place the walnuts on a baking sheet and bake at 350º F for 5-8 minutes, or until golden brown. Let cool.

2. When cooled, place the toasted walnuts in your food processor, and process until they are finely ground, similar to course sand. Set aside.

3. In a bowl, combine the cocoa powder, flour, baking soda, baking powder and salt. Stir in the chopped walnuts. Set aside.

4. In your mixer, cream the butter and sugar until fluffy, about 2 minutes. Add the milk, vanilla, and egg; beat until combined.

5. Gradually add the flour- nut mixture, mixing just until incorporated, batter will look thick.

6. Place the dough in the refrigerator and chill at least 4 hours, or over night.

7. Pre-heat the oven to 350º F.

8. Place the pearl sugar into a small container.

9. Remove the dough from the refrigerator, scoop a teaspoon of the dough into the palm of your hand and roll into a 1-inch ball. Then roll the ball into the pearl sugar coating it well. Place the cookie on to a baking sheet repeat with the remaining dough. Bake at 350º F for 10-12 minutes, or until golden brown.

10. Transfer the cookies to a cooling rack and let cool. Place on platter and enjoy.

TIPS & TRICKS

• The dough can be made and stored in the refrigerator for several days. Once the cookies are baked, they can be refrigerated for a week. They can also be frozen.

• Pearl sugar is this amazing crystalized sugar that doesn’t melt at high temperatures. You can top your favorite cookies or muffins with it. You can purchase it at www.kingarthurflour.com

DOWNLOAD CHOCOLATE PEAR COOKIES RECIPE
In Nov 2019 Appetizer Class Tags cocoa powder, winter, appetizer, starter, cookie, chocolate pearl, holiday
Comment

Salmon Pâté with Crostini

April 15, 2019 Nancy Madok
salmon:ingrd.jpg

Ingredients

1 baguette, sliced into 16 pieces diagonally
¼ c olive oil
4 oz. cream cheese, room temperature
8 oz. smoked salmon, chopped
1 shallot, finely chopped
1 T lemon zest
2 T lemon juice
½ cup Greek nonfat yogurt
1T fresh dill finely chopped
salt & pepper
fresh dill and capers for garnish

1. Preheat the oven to 425º F.

2. Place the sliced bread onto a baking sheet. Brush each slice with a little olive oil. Bake until golden brown, about 8-10 minutes. Set aside.

3. In the bowl of your food processor, add the cream cheese and pulse 2-3 times. Add the salmon, shallots, lemon zest, lemon juice, yogurt, and dill. Pulse a few time until combined and reached desired smoothness (I like my pâté a bit chunky). Season with salt and pepper. Place the salmon pâté in bowl, terrine, or mold, and place in refrigerator until chilled firm, about 3 hours.

4. Remove ½ hour before serving. Decorate the top with dill and capers. Serve with crostini.

Tips & Tricks

• The differences between a mouse and a pâté are texture. A mouse is pureed smooth, where a pâté is a little chunky. So do as you prefer.

• This pâté can be made 3 days is advance.

• Serve the pâté with crostini, bagels, chips, or crackers. It is fantastic as a filling for tea sandwiches or if pureed smoothly can be used as a filling for stuffing cherry tomatoes or on top of cucumbers.

Download Salmon Pate with Crostini
In April 2019 Tags appetizer, starter, spring, Salmon, Pate, Crostini, lemon, Greek Yogurt, Dill, Capers
Comment

Roasted Beet & Fennel Salad

March 31, 2019 Nancy Madok
salad:cover.jpg
salad:ingred.jpg

Ingredients

8-10 medium red or golden beets
16 oz. goat cheese
½ cup olive oil
1T fresh thyme, slightly chopped
1tsp. fresh rosemary, finely chopped
½ tsp. salt
4-5 grinds black pepper

Vinaigrette:
1T Dijon mustard
2T Balsamic vinegar
½ cup extra-virgin olive oil
3 bulbs of fennel
8 cups mixed greens, washed

1. Pre heat the oven to 350° F.

2. Line a small baking sheet with aluminum foil. Place the beets on the tray and place the tray into the oven to roast until they become soft to the touch, about 50-60 minutes. When they are soft, remove from the oven and set them aside until they are cool enough to handle.

3. When the beets are cool, use a peeler or paring knife to remove the skin. Cut the beets into a large dice and set aside.

4. Cheese: In a small bowl, combine the olive oil, thyme, rosemary, salt and pepper. Mix until combined. Pour ½ of the oil mixture into a shallow plastic or glass container with a lid. Cut the goat cheese into 1-inch rounds and place on top of the oil. Drizzle the remaining oil on top of the cheese. Cover with lid and place in refrigerator to marinate for 4 hours. Remove the cheese from the fridge 1 hour before serving.

5. Vinaigrette: In a small bowl, whisk the mustard and vinegar together. Slowly add the oil, a few drops at first, and then add a steady stream until the vinaigrette is thick and emulsified. Season with salt and pepper.

salad6a.jpg

6. Salad: Using a knife or mandolin, slice the fennel bulbs into very thin then place in a serving bowl.

salad7.jpg

7. Add the salad greens and a little of the vinaigrette. Toss until well dressed. Place on platter or plates.

8. Top with beets and the cheese. Spoon a little of the oil marinade over cheese and beets. Serve immediately.

TIPS & TRICKS

• Beets without the green leaves can be stored in your fridge for several weeks. Once roasted, the beets can last for a week. I roast a bunch at time and peel then, as I need them.

• The marinated goat cheese can be made up to a week in advance. It is also great spread on crostini for a delicious and quick appetizer.

• You substitute fete for the goat cheese.

• You can change the mustard and vinegars to change and create different vinaigrettes.

DOWNLOAD ROASTED BEET FENNEL SALAD
In March 2019 Class Tags appetizer, starter, spring, beets, fennel, Goat Cheese, thyme, rosemary, dijon mustard
Comment

Crabby Cake With Remoulade Sauce

February 28, 2019 Nancy Madok
crab:cover.jpg
crab:ingred.jpg

Ingredients

Crab Cake:
1 pound fresh crab meat
¼ cup celery, finely diced
¼ cup green onion (white & light green part only), finely diced
1T parsley, finely chopped
1tsp. mustard, creole or whole grain
1tsp. lemon zest
2T lemon juice
1cup fresh breadcrumbs
Salt & pepper
2 eggs
½ cup olive oil

Remoulade:
1¼ cup mayonnaise (store bought or homemade see below)
¼ cup mustard, creole or whole grain
2T prepared horseradish
1T paprika
1 tsp. salt
¼ tsp. cayenne
¼ tsp. black pepper
1tsp. lemon zest
¼ cup lemon juice
¼ cup green onions, (white & light green part only), finely chopped
¼ cup celery, finely chopped
¼ cup Cornichon pickles finely chopped
Salt & pepper

crab#1.jpg

1. In a large bowl, add the crab, with your fingers break it up into pieces and check for any shells.

2. Add the celery, parsley, onions, mustard, lemon zest, juice and breadcrumbs. Carefully toss to keep the crab in nice-size pieces. Season with 1 tsp. salt and 4-5 grinds of pepper.

3. In a small bowl beat the eggs then add to crab and mix until well combined.

4. Place in refrigerator for 20 minutes, (no longer that 2hrs or it will get to soggy) Remove the crab mixture from the fridge. Place about a tablespoon of mixture in your hand and shape into ball. Place on tray, or mat. Repeat with remaining crab mixture.

crab#5.jpg

5. In a medium sauté pan, over medium heat add half the oil, allow it to heat up then place several crab balls into the pan (don’t overcrowd) Pat them down slightly into cakes. Cook the crab cakes 2-3 minutes on each side, until lightly brown. Remove from pan and place on tray. If necessary add the remaining oil and sauté the remaining cakes. Set aside

6. Remoulade Sauce: In a small bowl, combine all the ingredients and mix until combined, then season with salt and pepper.

7. Serve crab cakes warm or cold with sauce.

Mayonnaise

3 egg yolks
2tsp. Dijon mustard
1T vinegar
1 tsp. salt & pepper
1½-cup oil

1. In the bowl of food processor, combine the egg yolks, mustard, vinegar, salt & pepper. Pulse until combined. With motor running slowly, add a few drops of the oil then in a steady stream, add the remaining until the mixture becomes emulsified.

Tips & Tricks

• Crab cakes can be completely made and fried the day ahead. Allow to cool completely then cover and refrigerate. Right before serving, place the crab cakes on a rack on a baking sheet into a 425° oven for 5 minutes to reheat. Serve warm with sauce.

• These crab cakes are, of course, perfect as an appetizer with cocktails. Or as a first course, place 2-3 cakes on a plate or you can make 1 larger crab cake per person. Just increase the cooking time to 4-5 minutes a side.

• These cakes also make great picnic food or on top of a salad.

DOWNLOAD CRABBY CAKE RECIPE
In February 2019 Class Tags Winter, Crab Cake, starter, appetizer, Celery, Eggs, Mayonnaise, Mustard
Comment

Shrimp Cakes with Red Pepper Aioli Sauce

December 17, 2018 Nancy Madok
shrimp:cover.jpg
shrimp:ingred.jpg

Ingredients

Red Pepper Aioli Sauce:
4 cloves garlic, peeled
2 egg yolks
1T lemon juice
1 tsp. salt
4-5 grinds of pepper
½-cup olive oil
½ cup vegetable oil
½ cup roasted red peppers, drained
1T lemon zest

Cakes:
1 lb. shrimp, peeled and deveined
½ cup green onion (white and light green part), finely diced
1T parsley, finely chopped
1T lemon zest
2T lemon juice
1 egg, beaten
1 tsp. salt
4-5 grinds of pepper
1cup panko breadcrumbs
½ cup vegetable oil

shrimp1.jpg

1. Sauce: In the bowl of your food processor with the motor running, add the garlic. Process until finely chopped.

shrimp2.jpg
shrimp2a.jpg

2. Add the eggs yolks, lemon juice, salt and pepper. Pulse until combined. Scrape down the sides of the bowl

3. Combine the oils into a liquid measuring cup.

shrimp4.jpg
shrimp4a.jpg

4. With the motor running, slowly add a few drops of the oil, then in a steady stream, continue adding the oil until it becomes a thick sauce.

5. Place the aioli in a small bowl.

shrimp6.jpg
shrimp6a.jpg

6. In the bowl of your food processor (no need to wash it) with the motor running, add the red pepper; process until finely chopped.

shrimp7.jpg
shrimp7a.jpg

7. Fold the chopped red pepper and lemon zest into the aioli mayonnaise. Adjust seasoning if needed. Place in serving bowl. Set aside until needed.

shrimp8.jpg

8. Cakes: In the bowl of your food processor (no need to wash it if your preparing them right after the sauce), place half the shrimp. Pulse until finely chopped.

shrimp9.jpg

9. Add the remaining shrimp, green onion, parsley, lemon zest, and juice. Pulse until combined.

shrimp10.jpg
shrimp10a.jpg

10. Add the beaten egg, salt and pepper; pulse a few times until combined.

shrimp11.jpg

11. Dampen your hands. Place a tablespoon of the shrimp mixture in your hands and form into a round patty. Place on a parchment-lined baking sheet. Repeat with remaining mixture, forming about 20 cakes. Place the tray in the refrigerator for 30 minutes.

12. Pre-heat oven to 450° F.

shrimp13.jpg

13. In a medium size bowl, place the panko breadcrumbs. Gently toss each patty in the panko until well coated, placing them on a cooking rack on a baking sheet pan.

shrimp14.jpg

14. In a medium sauté pan, over medium-high heat, add half the oil; when the oil is hot, add the patties to the pan (don’t overcrowd) and pat then down slightly into cakes. Cook the cakes for 2-3 minutes until golden brown, flipping over once. When the cakes are brown, transfer them back on to the cooking rack on the baking sheet pan. Continue with the remaining cakes. Add more oil if needed.

shrimp15&16.jpg

15. Place the baking sheet in the oven and cook 10-12 minutes until the shrimp are cooked.

16. Remove from oven and let cool slightly. Transfer to serving platter and serve with red pepper aioli sauce.

TIPS & TRICKS

• You may substitute 1-cup prepared mayonnaise instead of making the aioli. Just add the 4 cloves garlic to step 6 and pulse until chopped, then continue with# 7. Making homemade mayo is so delicious and easy with the food processor. Do give it a try once. It takes just 3 minutes and it could change your life. ☺ Sauce can be made 3 days ahead.

• You can prepared the shrimp cakes ahead and then reheat just before serving. To reheat: Place on a baking sheet with a rack in a 425° F oven for 5-7 minutes, or until hot.

DownloAD SHRIMP CAKES RECIPE
In December 2018 Class Tags Winter, starter, Christmas, Holiday, Red Pepper, Aioli, Panko Crumbs
Comment

Confetti Eggs

October 30, 2018 Nancy Madok
eggs:cover.jpg

Ingredients

12 cold large eggs

Brine:
2 large beets cut in quarters
4 cups distilled white vinegar
2½ cups water
3T-granulated sugar
1T salt
4 black peppercorns

½ cup mayonnaise (store bought or homemade)
Salt and pepper

2 T chives finely chopped
3 T red, yellow, or orange bell peppers finely chopped

1. To hard-boil eggs: Carefully place the eggs in a saucepan with a lid, and cover with cold water. Bring the water to a boil. Once water has come to a boil, remove the pot from heat and cover with the lid. Let the eggs sit for 15 minutes. Remove the eggs from the water. Place them in a bowl filled with ice water and let them sit for 15 minutes. Remove from water and peel. Set aside.

2. Brine: In a large saucepan, combine the beets, vinegar, water, sugar, salt, and pepper. Bring the mixture to a boil. Then reduce the heat to a simmer and let cook 15 minutes. Remove from the heat and let cool completely. Strain the mixture. Set the beets aside.

3. Place the hard-boiled eggs into a large glass jar with a lid. Cover with the brine and place in refrigerator. Marinate for 2-4 hours.

4. Remove the eggs from the brine. Cut them in half. Place the whites onto a platter and the yolks into a small bowl. Using a fork, smash the yolks into crumbs. Stir in the mayonnaise and season with salt and pepper. Set aside.

5. Using a spoon or pastry bag, pipe the yolk mixture into the whites.

6. Sprinkle on top of each egg chopped chives, radishes, and peppers. Serve either chilled or at room temperature.

Homemade Mayonnaise

3 egg yolks
2 tsp. mustard
1T vinegar
1 tsp. salt & pepper
1½-cup oil

1. In a medium size bowl, food processor, or blender, combine the egg yolks, mustard, vinegar, salt, and pepper. Whisk until combined. Slowly in a steady stream, add the oil. Whisk until the mixture becomes emulsified

TIPS & TRICKS

Tips & Tricks:

• Using old eggs can sometimes make them easier to peel. Look on the carton for the expiration date and buy eggs close to that date. This is because the eggs lose moisture though the pore in their shell as they age, which makes the air pocket at the top of the egg larger. Start peeling at the top of the egg. The ph also changes in the egg, which makes them adhere to the shell less. Sometimes you’re just going to get a “bad egg” that doesn’t peel so I also cook an extra one or two. ☺

• Always use cold eggs and cold water so they gently heat up, and have less chance of cracking.

• The longer you marinate the eggs in the brine, the darker the color will become.

• You can peel and use the pickled beets in salad or as garnish.

In October 2018 Class Tags appetizer, starter, eggs, Beets, Peppercorns, Bell Peppers, fall
Comment

White Bean & Roasted Garlic Dip

October 30, 2018 Nancy Madok
bean:cover.jpg
bean:ingrd.jpg

Ingredients

1 large head garlic
1T olive oil

4 cup cannellini or small white bean or 2 14 oz. cans of beans, drained
1T lemon zest
2T lemon juice
2T water
Salt & pepper

2T olive oil
¼ cup sundried tomatoes, oil packed, drained, and chopped
¼ cup hazelnuts, toasted and chopped
3T parsley, chopped finely

Crostini:

1 baguette loaf, cut on diagonal into 20 thin slices
¼ cup olive oil

1. Preheat oven to 350º F.

2. Line a small baking sheet or pan with parchment paper. Cut off the top of the garlic head and place on baking sheet. Drizzle olive oil on top. Place in oven and bake until soft to the touch, about 45-50 minutes. Let cool.

bean3.jpg

3. Once the garlic is cool, squeeze all the cloves out into a food processor. Pulse a few times.

4. Add the beans, lemon zest, juice, and water. Blend until smooth and creamy. If the mixture is too thick, add another tablespoon or two of water. Season with salt and pepper.

5. Pour the bean dip into a shallow bowl. Drizzle a little olive oil on top. Sprinkle the sundried tomatoes, hazelnuts, and parsley on top.

6. Serve with crudité, pita chips, or crostini

Beans:

1. Rinse the beans to remove foreign particles. Place in a bowl and cover with cold water; soak the beans overnight. Drain beans.
2. In a large pan with a lid, add the soaked and drained beans. Cover with water.
3. Bring beans to a boil, then lower heat to a simmer place. Cover ¾ of the pot and simmer until beans are tender, about 40-60 minutes. Add more water if necessary. Season with salt and pepper. Set beans and cooking liquid aside until needed. Makes 8 Cups.

Roasted Nuts:

1. Preheat oven 350º F. Place nuts on a baking sheet and bake for 5 minutes. Shake the pan and continue baking until nuts are toasted, about 3-5 more minutes. Set aside.

Crostini:

1. Preheat the oven to 400º F.
2. Place the sliced bread onto a baking sheet. Brush each slice with a little olive oil. Bake until golden brown, about 8-10 minutes. Set aside.

TIPS & TRICKS

• Just don’t roast 1 head of garlic, but instead several. It is great smeared on a crostini with a glass of wine as an appetizer, or add to your favorite sauce or soup.

• You can also top the dip with chopped olives or different types of nuts like almonds and pecans.

• Can be made 3 days in advance. Just cover securely with plastic wrap.

In October 2018 Class Tags White Bean, Cannellini bean, Lemo, appetizer, starter, fall, Crostini, Hazelnuts, Fall
Comment

Curried Beef Wontons, Spicy Mustard Sauce

October 30, 2018 Nancy Madok
wonton:cover.jpg
Wontingr.jpg

Ingredients

Curry Spice Blend:

1 tsp. black peppercorns
4 cloves
1 tsp. coriander seeds
1 tsp. cumin seeds
1 tsp. fennel seeds
½ tsp. fenugreek seeds
1tsp. paprika
1tsp. turmeric
½ tsp. salt

2T olive oil
1 medium onion, medium diced
2 cloves garlic crushed
1 pound ground beef
1 cup frozen peas
1 package Wonton wrapper
Vegetable oil

Mustard Sauce:

½ cup mayonnaise (store bought or homemade)
½ cup Greek plain yogurt
4T mustard
1T Tabasco
Ground black pepper

1. In a small sauté pan over low heat, add the black peppercorns, cloves, coriander, cumin, fennel, and fenugreek seeds. Toast until fragrant. In a spice grinder, grind the toasted spices. Add the paprika, turmeric, and salt. Grind until blended. Set aside.

2. In a large sauté pan over medium heat, heat 2 tablespoons of the olive oil; sauté the onion until soft, about 3-4 minutes. Add the garlic, ground beef, and 3 tablespoons of curry spice blend. Stir until combined. Continue cooking until the meat is completely cooked, about 8-10 minutes more.

3. Remove from heat and stir in the frozen peas. Season with salt and pepper and allow to cool completely.

4. Once the mixture is cooled, place in food processor and blend until smooth.

wonton5b.jpg

5. Take a wonton wrapper and place a teaspoon of the curry beef filling in the middle of the wonton. Lightly brush the edge of the wrapper with water, and then fold the wrapper over the filling to make a triangle.

wonton6.jpg
wonton6a.jpg

6. Lightly brush the pointed ends with a little water and fold them toward the middle, making a little bishop’s hat. Place on a parchment-lined baking sheet. Repeat with the remaining wontons. Don’t allow the wontons to touch each other.

7. In a small bowl, combine the mayonnaise, yogurt, mustard, Tabasco, and 4-5 grinds of black pepper. Taste the sauce, adding more Tabasco, pepper, and a little salt if needed, making it as spicy as you like. Set aside.

8. In a large sauté pan over medium heat, add enough vegetable oil to have a ½ inch in the bottom of pan. Once the oil is hot, add several wontons. Do not overcrowd the pan.

9. Fry the wontons, turning once or twice until crispy brown on both sides, about 2-3 minutes. Place on a paper towel-lined plate. Let drain and slightly cool. Repeat with remaining wontons.

10. Transfer the wontons on a platter and serve with spicy mustard sauce.

Homemade Mayonnaise

3 egg yolks

2tsp. mustard

1T vinegar

1 tsp. salt & pepper

1½-cup oil

1. In a medium size bowl, food processor, or blender, combine the egg yolks, mustard, vinegar, salt, and pepper. Whisk until combined. Slowly, in a steady stream, add the oil. Whisk until the mixture becomes emulsified.

TIPS & TRICKS

• Please take the time and try to make your own curry spice blend. It is far superior to anything you will buy on the shelf.

• I purchase all my individual spices at a Middle Eastern market. They sell them in bulk and are very inexpensive. I save spice jars from other spices and blend a double or triple batch to have on hand.

• I use a coffee grinder as a spice grinder. But once you grind the spices, you can’t go back to grinding coffee!! ☺

• Make sure the wontons do not touch each other or they will stick together. You can prepare these 3 days in advance. Just make sure to cover well.

• They also freeze beautifully. Place the trays of wontons in freezer and allow them to become frozen. Then transfer into a container or plastic bag. When ready to use, heat the oil and place the frozen wontons directly in the oil. Only fry a few at a time since the frozen wontons will lower the heat of the oil and will otherwise become oily.

• Spicy mustard sauce can be made 3 days in advance and is great as a dip for veggies, or a spread on sandwiches. I like to use Tabasco because it adds a nice vinegary kick to the sauce, but you can substitute other hot sauces.

In October 2018 Class Tags Curry, starter, appetizer, fall, coriander, cumin, fennel, fenugreek, paprika, Greek Yogurt, Tabasco
Comment

Savory Corn Madeleine

October 30, 2018 Nancy Madok
madeleine:cover.jpg
madeleine:ingrd.jpg

1tsp. unsalted butter, room temperature

2T all-purpose flour

½ cup all-purpose flour

½ cup yellow corn meal

1 ½ tsp. baking soda

¼ tsp. salt

1 egg

½ cup buttermilk

3T butter, melted

3T chives, finely diced

½ cup pepper jack cheese, grated

1. Preheat the oven to 425º F.

madeleine2.jpg

2. Using the 1-teaspoon of butter, butter the madeleine molds. Then dust the molds with the 2 tablespoons of flour. Set the pan aside.

3. In a large bowl, sift together the flour, corn meal, baking soda, and salt.

madeleine4.jpg

4. Mix the egg, buttermilk, and butter together until combined.

5. Add the butter mixture to the flour mixture, mixing just until combined. Do not over mix. Fold in the chives and cheese.

madeleine6.jpg

6. Spoon 1 tablespoon of the batter into each prepared cookie mold. Bake until puffy and lightly browned, about 8-12 minutes.

7. Invert the pan onto a cooking rack, remove cookies, and let them cool.

8. Place on platter and serve warm or room temperature.

TIPS & TRICKS

• Use a paper towel or pastry brush to spread the butter over the molds. Even if your pan is non-stick, butter and flour the molds. The butter melts in the oven and helps make those beautiful shell indentations into the batter.

• Mix only until the batter starts to come together. Then fold in the cheese and chives. This way you don’t over mix the batter.

• Scoop immediately into pan and get into the oven so that the buttermilk reacts with the baking soda, keeping the batter light and fluffy.

• You can add different goodies. Try substituting the pepper jack cheese with cheddar cheese, and the chives for green onions. You could also add chopped chilies, jalapeños, or even corn kernels.

• They go really well with a bowl of chili or a hearty soup. They are best made and eaten the same day.

In October 2018 Class Tags appetizer, starter, buttermilk, fall, corn meal
Comment

Date Rumaki

October 30, 2018 Nancy Madok
rumaki:cover.jpg

Ingredients

1-pound dates (about 24)
6 oz. goat cheese, room temperature
½ cup roasted almonds
1-pound (12 slices) prosciutto

1. Preheat the oven to 400º F. Line a baking sheet with aluminum foil and place a cooling rack on top of the baking pan.

2. Place the dates on a cutting board. Using a paring knife, make a slit on the side of each date and remove the pit.

3. Using a spoon or your fingers, stuff about a teaspoon of goat cheese into the date. Top the cheese with an almond or two. Pinch the date closed.

4. Place a piece of the prosciutto on the cutting board and cut it in half, lengthwise (only cut 1 piece at a time, so it doesn’t dry out). Wrap the date in a ½ piece of the prosciutto and secure it with a toothpick.

5. Place on the rack of the baking sheet. Repeat with the remaining dates. Leave a little space between each date as you place them on the baking sheet.

6. Place the baking sheet in the oven and bake for 6-7 minutes. Remove from the oven and flip over. Bake for an additional 6-7 minutes until crispy and brown.

7. Let cool slightly. Place on serving platter. Serve warm.

TIPS & TRICKS

• I like to use Medjool dates. They are a nice big size and have a soft, chewy texture and are so sweet!

• You can substitute the goat cheese with blue cheese and use toasted pecans or walnuts instead of almonds.

• The dates can be stuffed 2 days in advance. Just cover them well with plastic film so they don’t dry out.

In October 2018 Class Tags appetizer, starter, Fall, Goat Cheese, dates, Almonds, prosciutto
Comment

Baci di Dama

October 30, 2018 Nancy Madok
baci:cover.jpg

Ingredients

2/3-cup raw hazelnuts
¾ cup and 1-tablespoon all-purpose flour
1/3 cup and 1-tablespoon granulated sugar
7 T unsalted butter, cut into cubes, chilled
1 cup Nutella

1. Preheat oven 350º F. Place nuts on a rimmed baking sheet and bake for 7 minutes. Shake the pan and continue baking until nuts are toasted, about 7 more minutes.

2. Remove the nuts from the oven. Using a kitchen towel, rub them until the loose skins come off. Don’t worry if some of the skins don’t come off. Set aside and allow to completely cool.

3. Place the cooled hazelnuts in the bowl of your food processor. Process until mixture resembles sand.

4. Add the flour and sugar. Pulse a few times until combined.

5. Add the cold butter and process until the mixture comes together. It might take a few minutes.

baci6.jpg

6. Pour the dough onto the counter. Kneed into a ball. Then cut the ball into fourths.

7. Roll one section of the dough into a log about 12 inches long. Cut the log into equal sized pieces, about the size of a small marble.

8. Roll into a smooth ball. Place on baking sheet. You can put the balls close together. Repeat with the remaining logs. Place the tray in the refrigerator for at least four hours.

9. When ready to bake, preheat oven 320º F. Bake the cookies for 12-15 minutes. The cookies will be pale in color and very fragile. Remove the tray from the oven and allow the cookies to cool completely before touching.

10. Once the cookies are completely cooled, spoon a little Nutella on to the flat side of a cookie. Use another cookie to make a sandwich. Allow cookies to set a few minutes before serving.

11. Place on a platter and serve with your favorite beverage.

TIPS & TRICKS

• There are 2 secrets to making these cookies. One that the rolled cookies need to be completely cold; otherwise, when they are put into the oven, they will melt and not be beautiful little domes. Chill them at least 4 hours, but longer is ok too. The second trick is when baking the cookies, bake them just until they are pale and light brown on the bottom. Remove the cookies from the oven and allow them to completely cool before touching them. If you try to move them before they’re cool, they will collapse into a crumbly mess.

• The rolled cookies can also be placed in the freezer to be baked later. Once they are completely frozen, you can store them in a container or plastic bag. When ready to bake, place on sheet pan, pop them into the oven directly, and bake for 12-15 minutes.

• Cookies can be made a week in advance.

• I use a small plastic bag as a pastry bag to fill the cookies with Nutella.

In October 2018 Class Tags appetizer, starter, hazelnuts, nutella, fall
Comment

Pomegranate Champagne Punch

October 30, 2018 Nancy Madok
punch:cover.jpg

Ingredients

1 orange, skin on, thinly sliced into half moons
¼ cup mint leaves
¼ cup pomegranate seeds
¼ cup Cointreau or orange liquor
2 cups cold ginger ale
1-cup cold unsweetened pomegranate juice
1 bottle champagne or sparking wine

punch1c.jpg

1. To remove the seeds from the pomegranate, score/cut around the middle of the pomegranate, cutting though the skin but not cutting it half. Tear it open and gently “crack” the halves. Place a half of pomegranate in your hand upside down over a bowl and gentle bang on it with a wooden spoon until all the seeds fall out.

2. Fill a small bowl, mold, or cake pan with the sliced oranges, mint leaves and pomegranates seeds. Fill with 4 cups of water. Place in freezer until frozen.

punch3.jpg

3. In a punch bowl, add the frozen fruit ring.

punch4.jpg

4. Add the Cointreau, ginger ale, pomegranate juice, and champagne or sparkling wine. Stir.

5. Pour into glasses and serve immediately,

TIPS & TRICKS

• Place the mold in the freezer then fill it with water.

• Ice ring will keep punch cold for several hours. Double the liquid to serve more people.

In October 2018 Class Tags appetizer, starter, Fall, Mint Leaves, {p, Pomegranate, Cointreau, Champagne
Comment

Frico (Cheese Crisps)

September 30, 2018 Nancy Madok
frico:cover.jpg

Ingredients

1 cup finely shredded or grated Parmigiano cheese

1. Preheat oven to 375º F.

2. Line 2 baking pans with parchment paper.

3. To grate cheese: Allow the cheese to set on your counter for 30 minutes to slightly soften. Remover the rind and set aside. Cut the cheese into medium dice.

4. Working in batches, grind the cheese in your blender or food processor until it’s a fine grind.

5. Sprinkle 2 tablespoons of the mixture on a pan to form a 4-inch circle. Leave room between each cheese circle. Repeat with the rest of the mixture, forming approximately four 4-inch circles on each baking pan.

6. Bake one sheet at a time for 6-8 minutes, just until lightly brown.

7. Let the fricos sit on the tray for a minute, then carefully remove from pan and place on cooling rack to completely cool and crisp up. You can also drape the fricos over a rolling pin to give them a curved shape. Repeat with remaining tray.

8. Best served the day they are baked, as a side with the gazpacho or as an appetizer.

TIPS & TRICKS

• Since this dish only has 1 ingredients use the best cheese you can.

• Be careful when grinding the cheese in the blender or food processor, work in small batches so you don’t over work the machine making the motor get warm and then melting the cheese. Traditional the cheese is grated by hand at the time it used, I know this is cheating but if done in small batched the results is still good. Extra grated cheese can be stored in an airtight container.

• These make an absolutely easy, decanted appetizer

In September 2018 Class Tags appetizer, starter, Parmigiano, Cheese Crisp, Fall, Easy
Comment

Pasta with Caramelized Tomatoes, Basil & Cheese

April 15, 2018 Nancy Madok
pasta:cover.jpg
pasta:ingred.jpg

Ingredients

2 pounds cherry or grape tomatoes

3T olive oil
1 medium onion, finely chopped
3 cloves garlic, crushed
½ cup fresh basil leaves, chiffonade
salt & pepper
1 cup grated Parmigiano-Reggiano cheese

1lb fresh or dried pasta
extra Parmigiano-Reggiano cheese for serving 

1.    Preheat the oven to 300º F.

2.    Line a baking sheet pan with a piece of parchment paper. Cut the tomatoes in half lengthwise and place cut side up on the sheet pan. Place in the oven and roast for about 1½ -2 hours, or until they are slightly dry, caramelized and shriveled. Set aside.

3.    In a large pot of boiling water, add 1T of salt, return the water to a boil, then add the pasta and cook as directed; until al dente.

4.    In a medium sauté pan over medium-high heat, heat the olive oil, and then add the onion and sauté 3-4 minutes, until slightly soft. Add the garlic and cook 2-3 minutes.

pasta5.jpg

5.    Add the tomatoes, and cook until they are warmed. Season with salt, pepper. Set aside.


pasta6.jpg

6.    Drain the cooked pasta. Reserve 1½ cups of the cooking water. Toss the pasta with 1 cup of the cooking water

7.    Add the tomatoes, basil, and cheese and toss until well coated.  If the paste seems a little dry add the remaining cooking pasta liquid. 

8.     Serve immediately with extra cheese.

TIPS & TRICKS

•    The tomatoes can be made days ahead and stored in an airtight container.  I like to make a double batch so that I can use 1 for the recipe and one for bruschetta. I take toasted sliced bread top it with a little ricotta, the caramelized tomatoes, a drizzle of olive oil and a sprinkle of fresh basil. Now you have a fantastic appetizer!
•    Chiffonade is a French word that means to cut into rags. To do this stack the basil leaves on top of each other, and then roll into a cigar shape tube. Use a knife slice crosswise across the basil into thin strips that look like ribbons, rags, or thin strips.
•    Buy a wedge of Parmigiano- Reggiano and grate it at home! The flavor is so superior then any pre-grated cheese.  Cut the cheese into 1- 2 inch squares. Place them in your food processor or blender. Blend until ground. Store in an airtight container. Save the rind of the cheese and add it to your vegetable soups, tomato sauces, cooked bean or lentil dishes. It adds an excellent flavor and a complexity to the dish. Just remove it before serving. They freeze wonderfully. 


DOWNLOAD RECIPE PDF HERE

In April 2018 Class Tags appetizer, starter, tomatoes, basil, Parmigiano-Reggiano cheese, spring
Comment

Asparagus, Artichokes, & Hazelnuts

March 25, 2018 Nancy Madok
aspara.cover.jpg

Ingredients

1T Dijon mustard
3T red wine vinegar
¼ cup olive oil

2 bunches (2pounds) asparagus, ends trimmed off
1 12-oz bag frozen artichokes heart, thawed
¼ cup lightly chopped toasted hazelnuts
salt & pepper

1.    In a small bowl, whisk the mustard and vinegar until combined.

2.    Slowly add the olive oil drop by drop until it starts to emulsify. Once the sauce has thickened, you can increase adding the olive oil. Season with salt and pepper. Set aside.


3.    In large sauté pan with a lid over medium heat, add the asparagus and artichokes. Cover with ½ cup of water. Place the lid on and cook for 4-7 minutes until the vegetable are cooked, but still have a crunch to them.

4.    Remove from the heat, drain off the water. Return to the pan toss with the dressing. Season with salt and pepper.

5.     Place on a platter. Sprinkle on chopped hazelnuts.

aspara6.jpg

6.    Serve immediately with a sprinkle of fleur de sel.

TIPS & TRICKS

•    You can use other vinegars: champagne, apple cider or lemon juice.
•    I like to use medium-size asparagus (similar is size to a pen), but you can use pencil thin or thicker, if you prefer. Cooking time will vary.
•    You may serve this dish cold, like a salad, or warm. Just toss with the dressing at the last moment since the vinaigrette will change the color of the vegetables. 

In March 2018 Class Tags appetizer, starter, Asparagus, Artichokes, Hazelnuts, Spring
Comment

PRIVACY POLICY 2020

COPYRIGHT 2020 Cucina Casa M